
Lighting in Unreal with photography principles using PBL

Much like our smartphones, Unreal Engine automates exposure to take care of the heavy lifting behind the scenes of virtual worlds. While this can be convenient, it can present challenges when dialing in values for key lighting components and working on multiple projects with different setups. This is why photographers often prefer to shoot in manual mode, setting their aperture, shutter speed and ISO to get predictable exposure (EV) for any given situation.
In this article, we’ll explore how to take a similar hands-on approach to lighting in Unreal Engine 5. We’ll look into setting up a Physically Based Lighting (PBL) workflow, understand how exposure is measured, and configure real-world values for directional light and post-process volumes. We’ll also dive into tone-mapping and local exposure to mimic a similar editing workflow to that of a photograph in Lightroom.
What is Physically Based Lighting, and why use it?
PBL refers to using real-world, measurable values and units for lighting, such as lux and lumens, to more accurately simulate light sources like the sun, a lamp, or a candle. This allows us to light more predictably with consistent results, similar to being on a film set or production shoot, ultimately removing a lot of the guesswork from the process.
To fully grasp Physically Based Lighting, it's essential to understand some key terms:
Lumen (lm): This unit measures the total amount of visible light emitted by a source. The higher lumen value means a brighter light source. A 100W incandescent bulb emits about 1600 lumens.
Lux (lux): While lumens measure the light emitted by a source, lux measures the illuminance on a surface. In simpler terms, it's the amount of light falling on a specific area. One lux is equal to one lumen per square meter.
Due to the sheer intensity of the Sun, its value in lumens would roughly be 3.9 x 10^28. This is why it’s far more practical to measure its value in lux to describe how bright a surface area is — something that can vary depending on whether it’s a sunny or cloudy day — rather than trying to express the sun’s total power.
Candelas (cd): Measures the light emitted by a source in a particular direction. Unlike lumens, which measure total light output, candelas focus on the intensity of light within a specific solid angle. This is particularly relevant for spotlights.
EV100: A standardized exposure value to match real-world lighting and photography principles. It’s the combination of aperture, shutter speed and ISO 100, allowing us to measure the brightness of a scene in the same way a camera would.
Example of auto-exposure
Below is an example of Unreal Engine’s auto-exposure. On the left, the directional light is set to 10 lux and on the right 100,000 lux. However, the perceived brightness of the scene remains exactly the same, making it difficult to dial in values or balance light sources accurately. By enabling HDR (Eye Adaptation) debug under Show>Visualize, we can actually see the EV value for each scene.
The left-hand side average scene EV100 is 0.8, and the right is 14 EV.

The right image has an exposure value of 14 EV when the sun is set to 100,000 lux. However, the image on the left is a mere 0.8 EV, which is equivalent to that of a moonlit night scene.

This is a table of reference for lighting conditions, lux, and EV values:
It’s also important to remember that while there are arbitrary values for general lighting conditions, these don’t take into account weather seasons, atmosphere, location or even cloud formation. Therefore, they should be used as a guide to establish more accurate ratios between lights/exposure rather than a set of defined numbers.
There are plenty of resources online that can give us EV values for specific scenarios, such as:
https://en.wikipedia.org/wiki/Orders_of_magnitude_(illuminance)
https://en.wikipedia.org/wiki/Exposure_value#Tabulated_exposure_values
However, we can also calculate EV100 using the formula based on specific reference photographs we choose.
Note: Shutter Speed = (1 / Time) = Fraction of a Second
EV100 = (log2 (Aperture² / (Shutter Speed) * 100 / ISO))
Thankfully, we can use this website to calculate this: https://www.omnicalculator.com/other/exposure
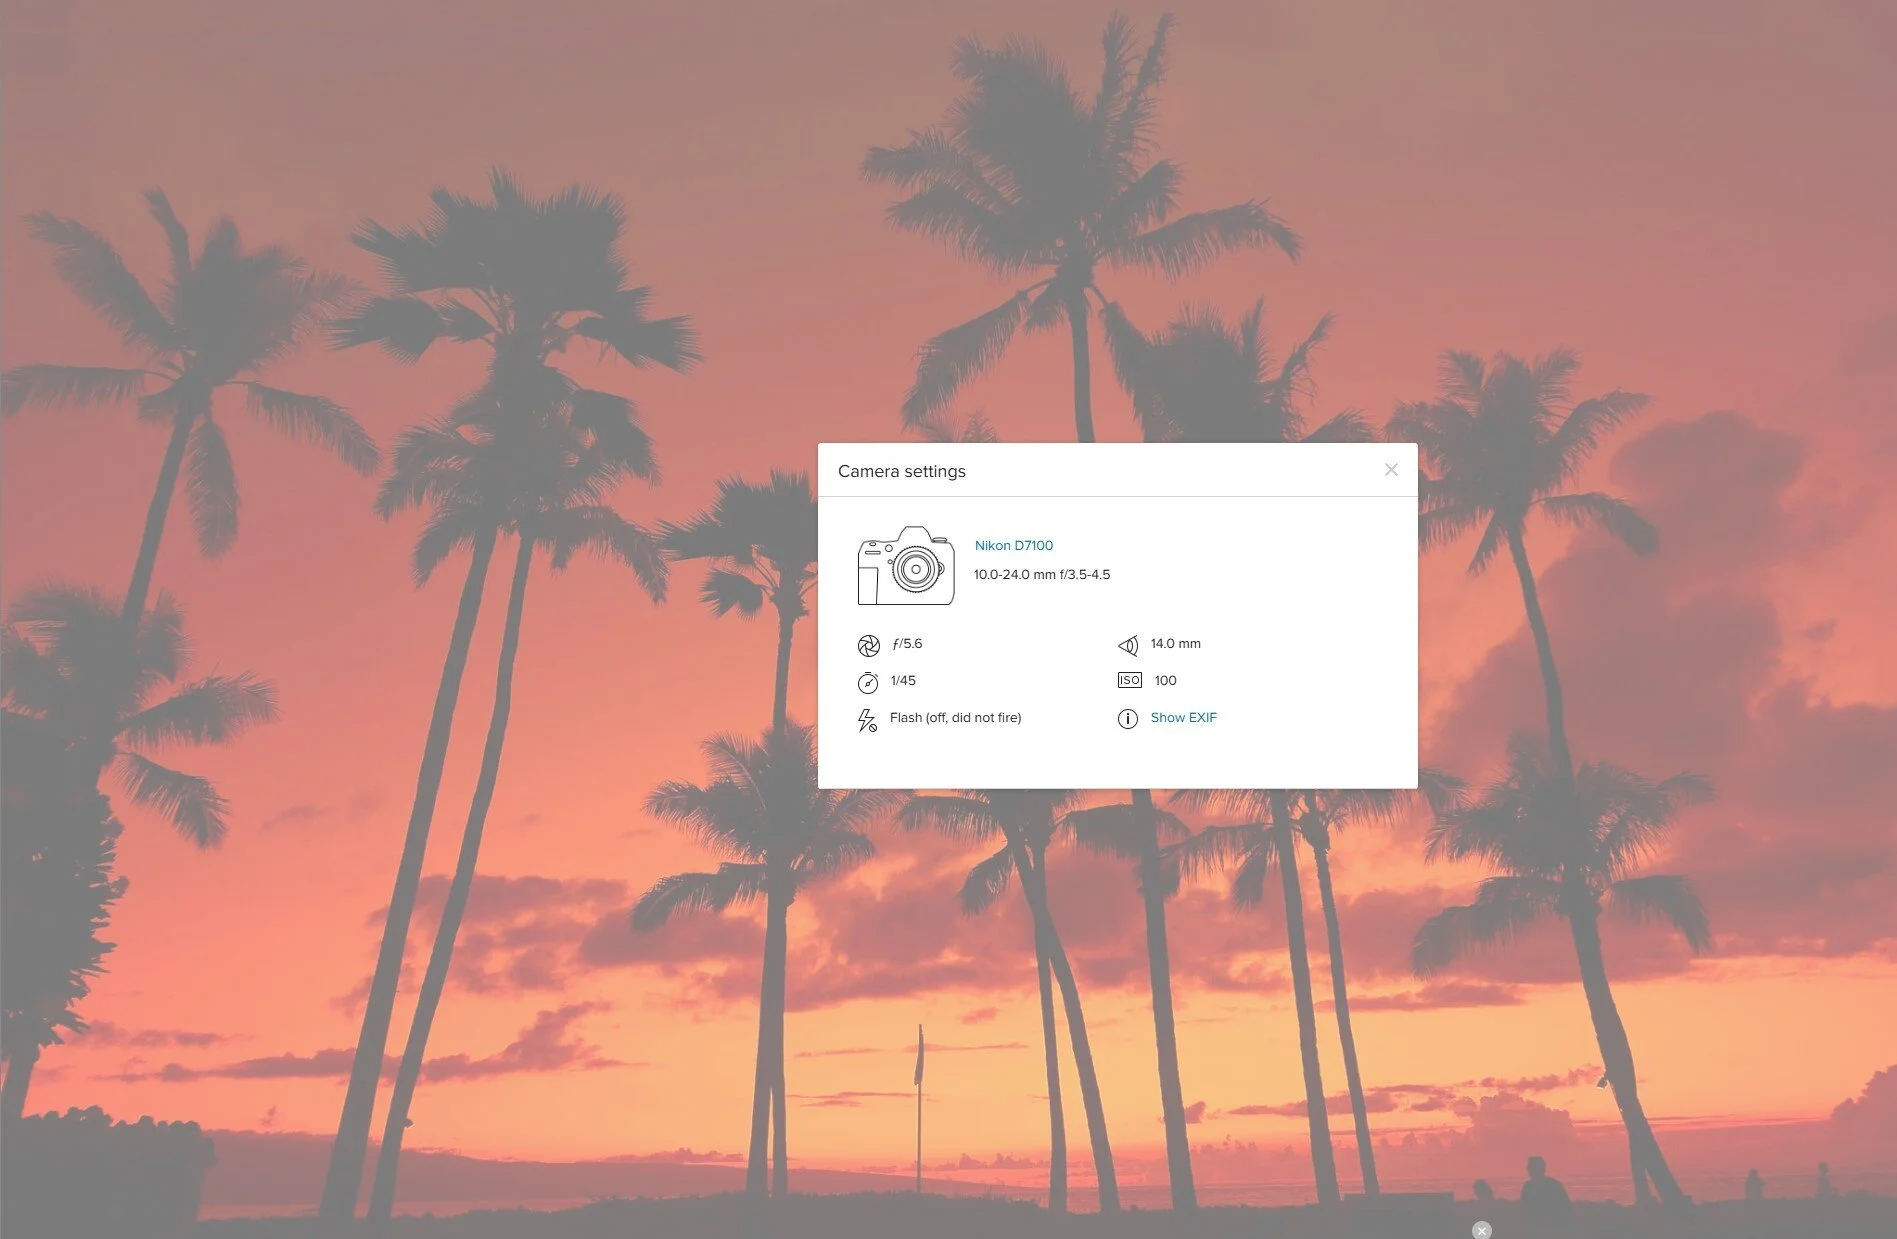
[Credit: Gianluca Bussolari, Maui sunset]
Entering the above values for aperture, shutter speed, and ISO, we can get the following value for 10.9 EV:

If we head to Unreal, we can look at how to correctly set up our post-process volume to our desired EV.
As mentioned earlier, Unreal generally enables auto-exposure by default, unless specifically changed in the PPV. Another approach commonly used is to clamp the min/max EV to 1 and adjust the scene brightness using the exposure compensation value. However, this is not physically correct and does not correlate when using real-world values.
Let's put the above into practice using a demo scene from Quixel. First, we'll set the directional light to 100,000 lux – a value suited for a sunny or slightly cloudy day with midday sun and adjust the Min/Max EV to 13.

This gives a good base to start looking at key/fill ratios and local exposure.
Here’s a general rule of thumb for key/fill ratios:
4:1 direct lighting/shade
3:1 sunrise/sunset
2:1 overcast
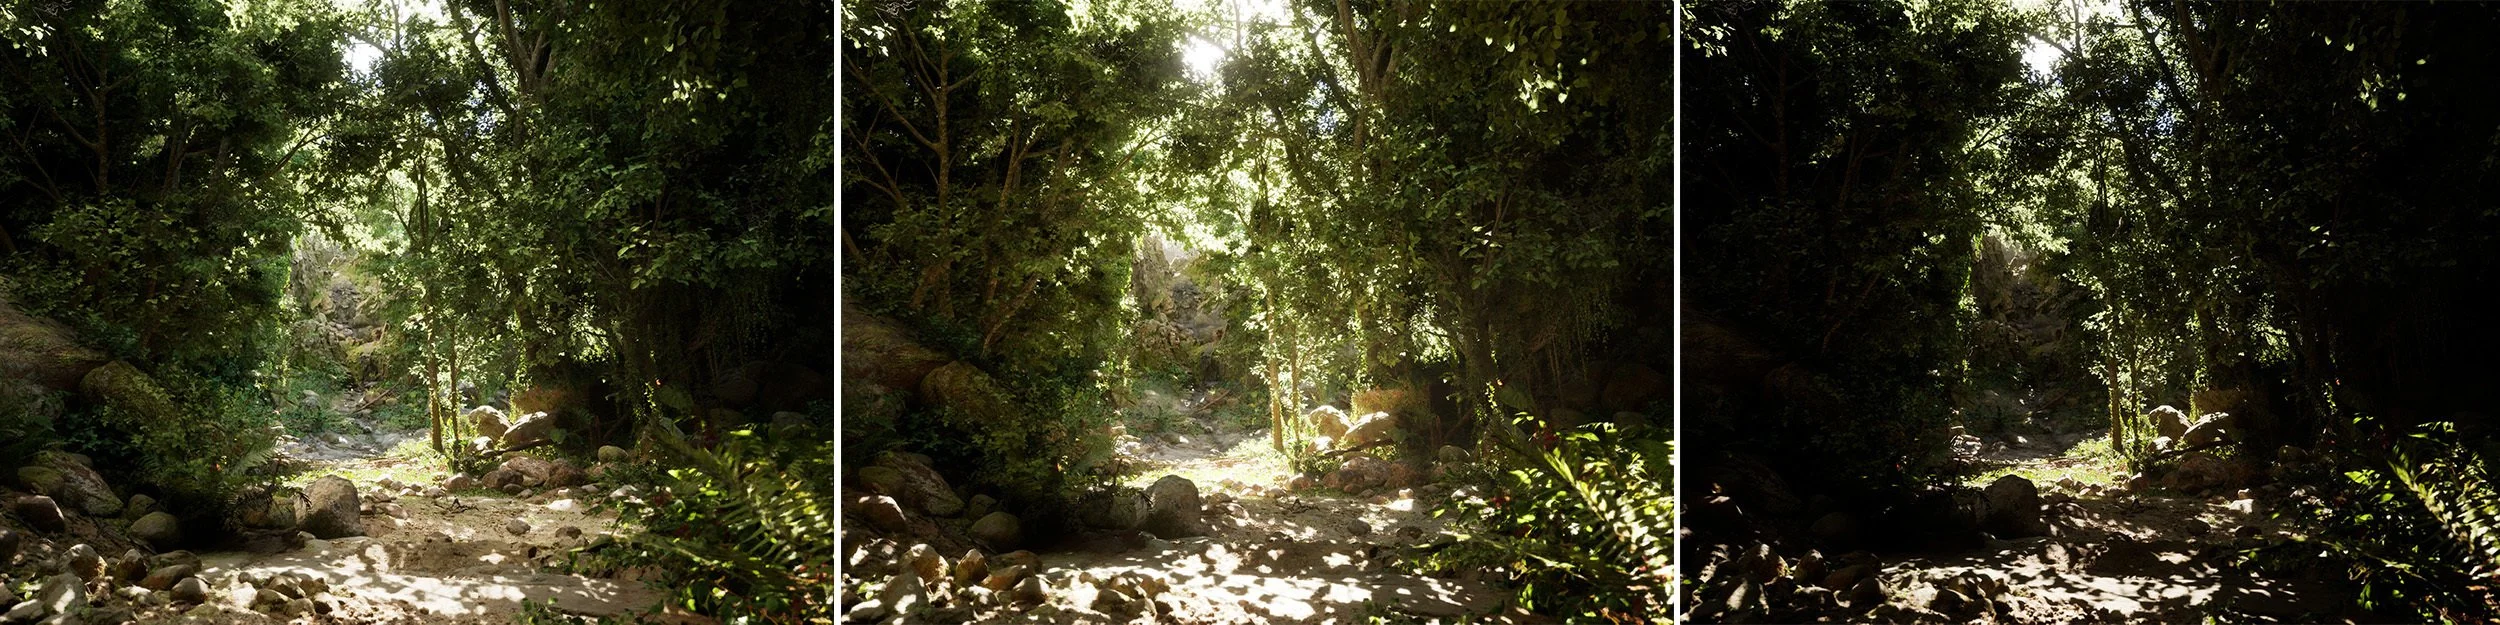
Using the HDR debug, we can spot meter the EV between the key/fill to get our ratios. Below, I have adjusted directional light Intensity between 100k/50k/10k to illustrate the ratios above.

While EV and lux values provide a solid technical foundation, it's ultimately up to the artist to shape the lighting in a way that supports the desired mood and storytelling. Realism is just a starting point – artistic intent brings it to life.
We can fine-tune the overall exposure further using local exposure and tone mapping. This is a very similar approach to photography in which a RAW file would be edited by adjusting the shadows and highlights and using a tone curve to set the overall contrast.
I’ll be using the Epic Games Electric Dreams demo to demonstrate a re-light using the PBL method.

[Reference photo/Unreal Engine 5, base PBL lighting]
I’ll be using the photo reference image on the right to demonstrate the power of tone mapping and local exposure to lift the Unreal scene and get a more realistic result.
Using the EXIF info, I calculated the EV scene value to be 9.5, and since the reference was shot at noon on a fairly bright sunny day, I set the directional light to 100,000 Lux.
While these settings work great in a direct lit environment, we can observe that the lighting in the shadows appears quite dark
The first thought would be to either increase the skylight intensity, which leads to a flat-looking scene that lacks depth or increase the exposure compensation, which instead results in blown-out highlights and far too much lift in the shadow areas of the image.
As a final resort, keeping the +2EV exposure compensation, we could try reducing the intensity of the sun to 25,000 lux; however, that lands us back at square one again with a dark-looking image.
Hopefully, this illustrates the battle when breaking the PBL approach and trying to light by fighting different variables.
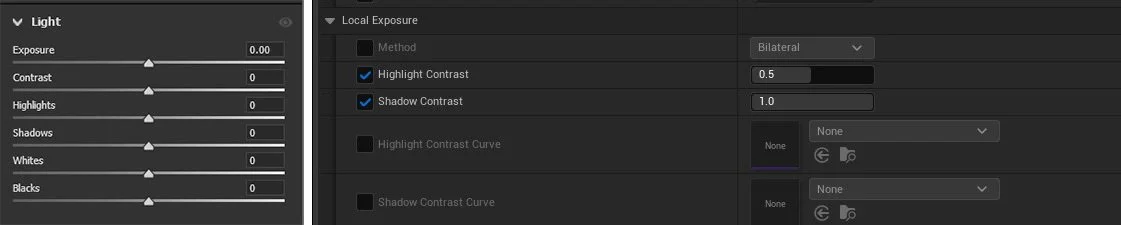
Thankfully, Unreal Engine comes with a host of local exposure and tone-mapping tools in the post process volume, which let us fine-tweak our scene with far greater control than the previous approaches.
We can tone down the highlight contrast to bring some detail back in the brightest areas of the image. If you’ve ever used Lightroom/Adobe Camera Raw, think of this as highlight/shadow sliders.
We can also adjust the overall tone mapping in the scene using the film settings. Again, this is very similar to the tone curve in LR or ACR.


Bringing up the HDR Eye adaptation debug, we can actually see the tone-curve in real time.
Toe is the bottom-left bend (shadows).
Slope is the middle section (midtones).
Shoulder is the top-right bend (highlights).
For this scene, I lifted the shadows (toe) from the default of 0.55 to 0.38 and added a little more contrast in the midtones by increasing the slope. I also lowered the highlights in the local exposure setting to remove any highlight clipping.
Although subtle, you can see the difference in the histogram/tone curve in the image below.

Overall, these small tweaks make a dramatic difference to the image while being very easy to control and tweak

[No Post Processing/local exposure and tone mapping applied]
Finally, I adjusted the white balance to a slightly warmer temperature as per the reference image, increased the overall global saturation to 1.1, and slightly pushed the gain for the highlights and shadows to a yellow/green hue.

This is a very brief introduction to PBL Lighting, but hopefully, it inspires you to tackle your own scenes or games with a new approach.
The main benefits are having physically accurate ratios between light sources with correct scene exposure values. While you can easily double your light intensity and half your exposure to maintain the same scene brightness, it quickly becomes confusing the more areas you add, especially if you’re mixing interior and exterior scenes.
PBL creates a solid foundation that can be utilised for multiple outputs, such as games, film, and virtual production, and maintains parity, allowing artists to easily jump into projects without any guesswork.
I highly recommend you conduct your own lighting studies using PBL, especially using photos you’ve taken yourself (even on a smartphone), as this will provide an accurate EV scene value for a baseline reference.
Lighting, similar to photography, can be dependent on so many variables; however, being able to control the key fundamentals allows far more freedom for experimentation and creativity.
Or as Picasso famously said, "Learn the rules like a pro, so you can break them like an artist."
