
Mastering fog: four levels of fog in Unreal

Fog is both a technical and artistic challenge – it drives mood and depth, but if you get it wrong, the entire scene can collapse visually.
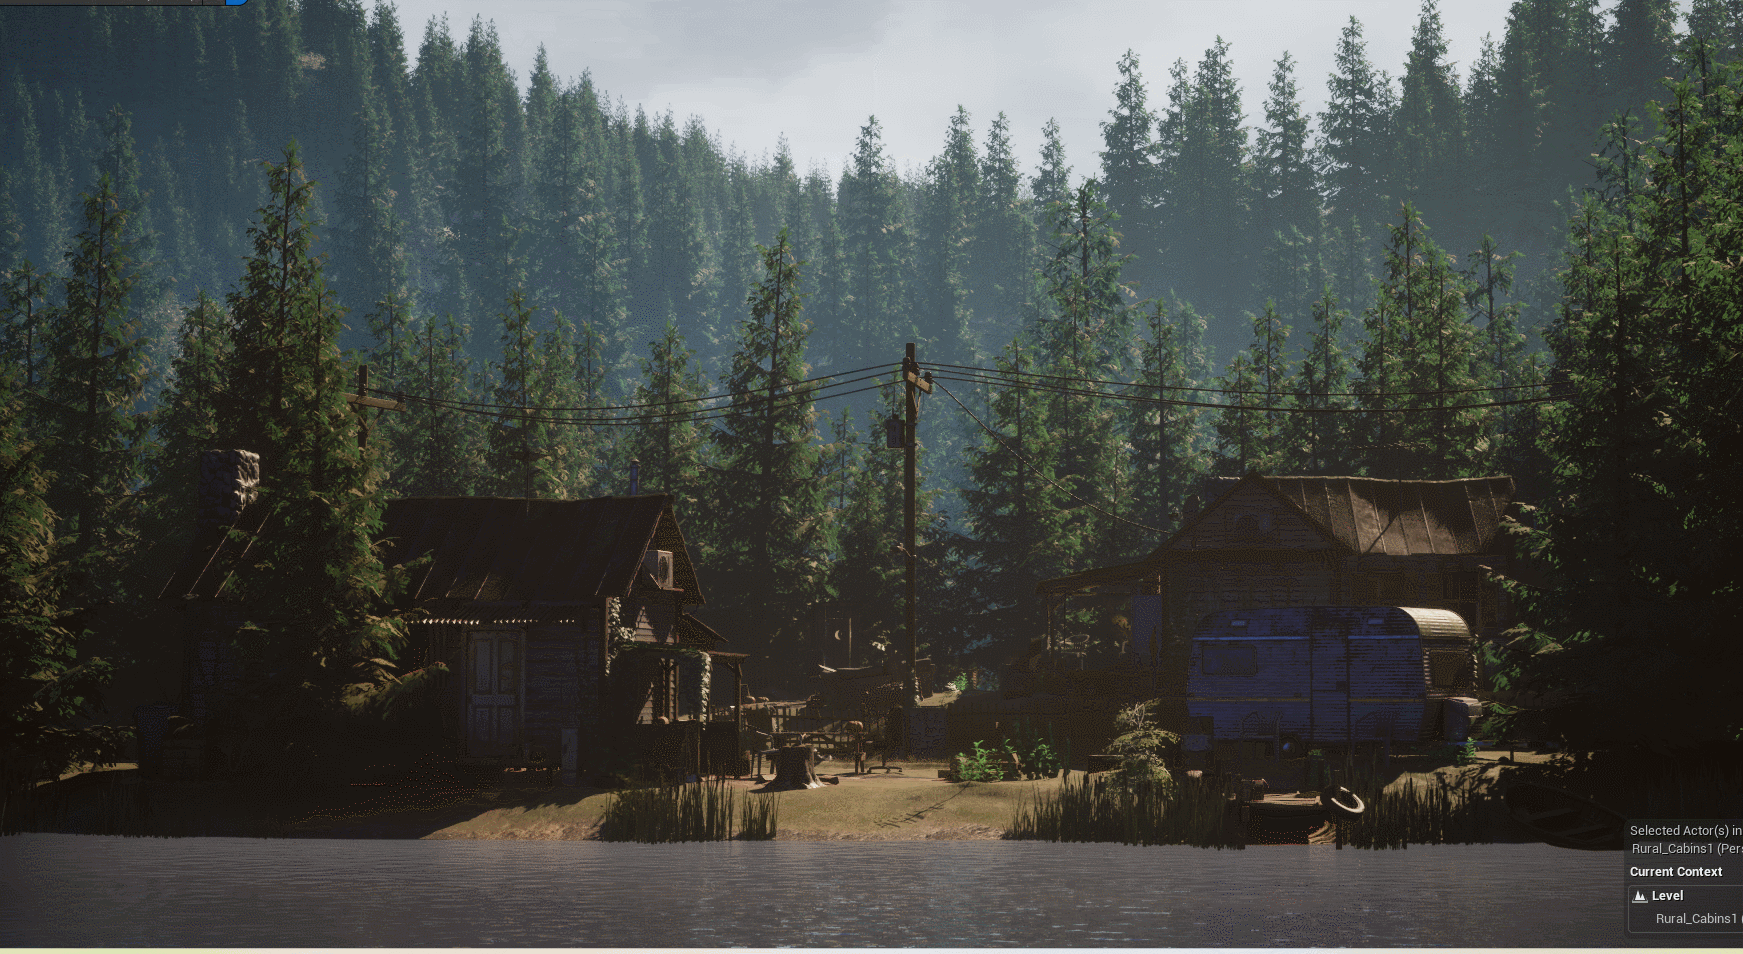
In this article, I'll discuss how fog enables you to create moody, mysterious environments with depth, movement, and character. I’m using the Modular Rural Cabin Scene, created by Maarten Hof and available on Fab, to illustrate my points.
Let’s dive into four types of fog.


Exponential height fog
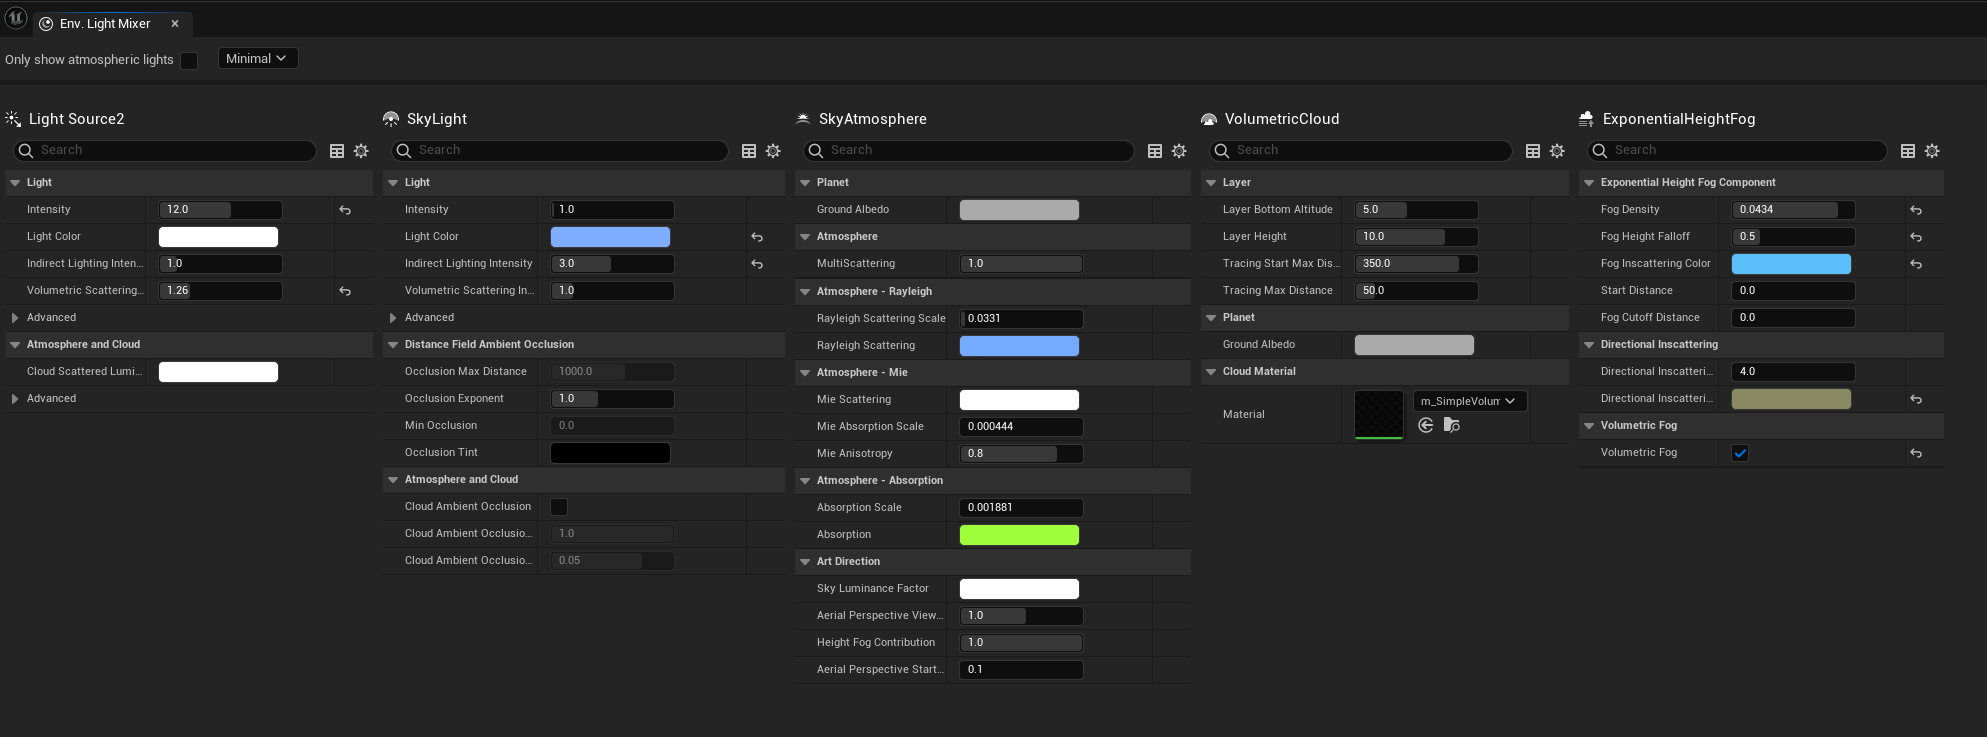
The first step in creating a moody foggy looking scene is to play with the settings in the environment mixer panels (Window>Env. Light Mixer). Combined, these tools are very powerful and can get you far in terms of setting the mood for the lighting on your project.
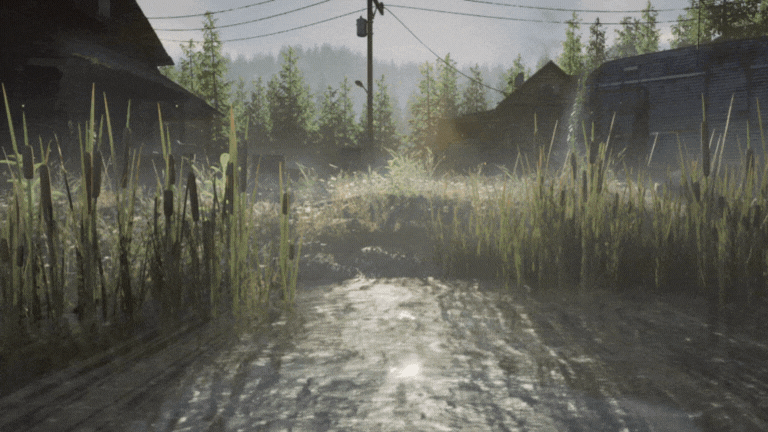
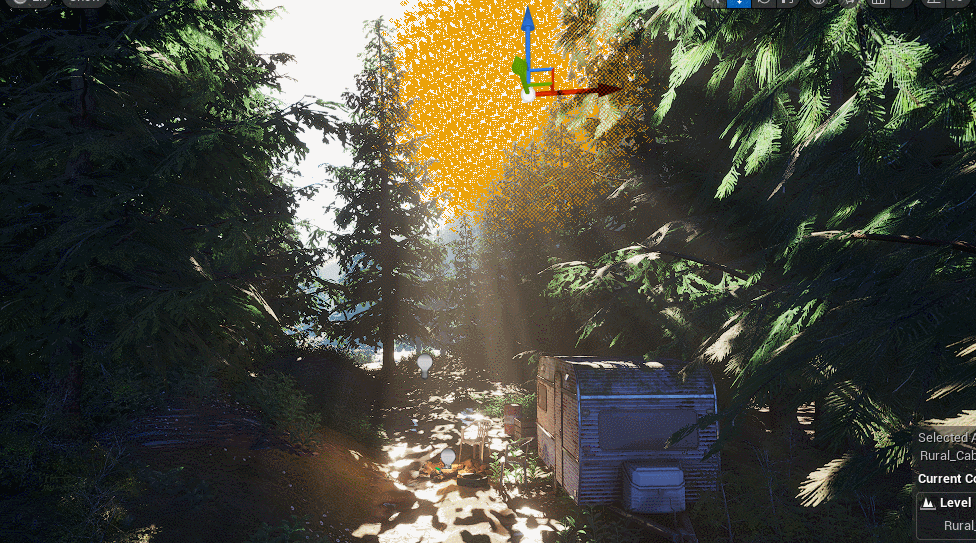
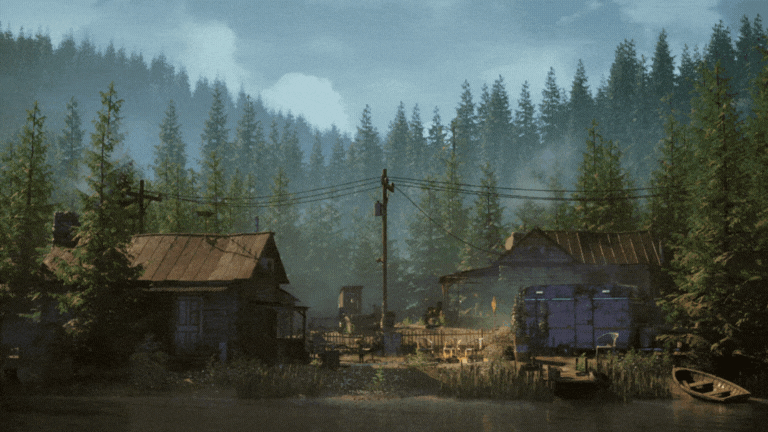
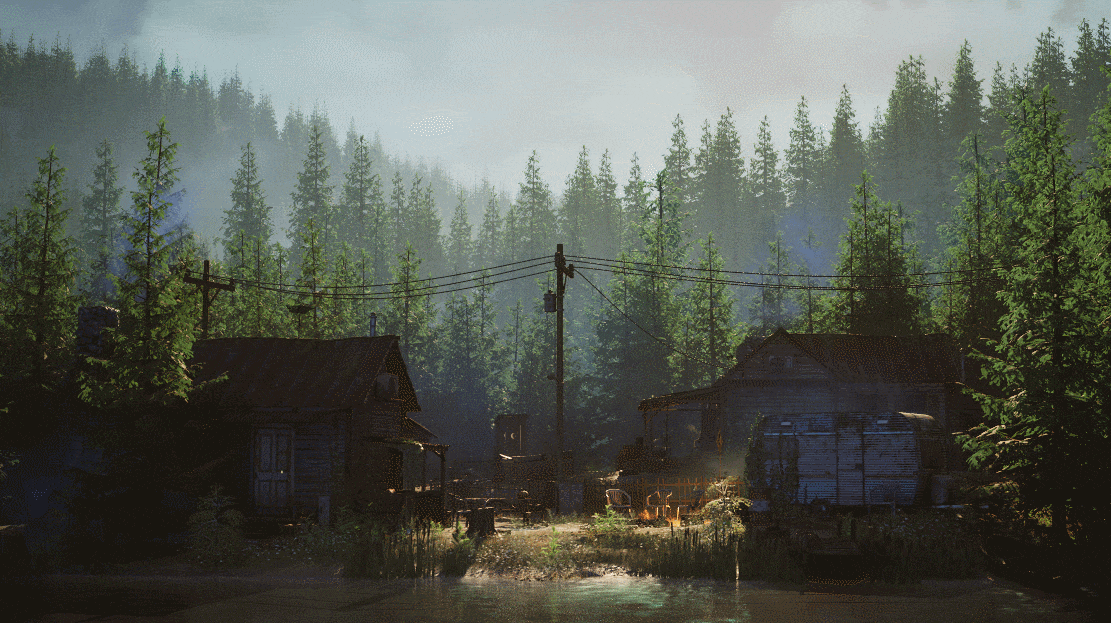
Here you can see my scene with and without exponential height fog turned on.
The first thing you need to do is set up the scene, complete with everything from your environment light mixer, as shown above. Then, enable volumetric fog in the exponential height fog settings.

You can play with the fog height falloff and the density to control how thick and intense your fog is. I needed my fog to cover the mountain in the background, so I had to lower the fog height falloff value.
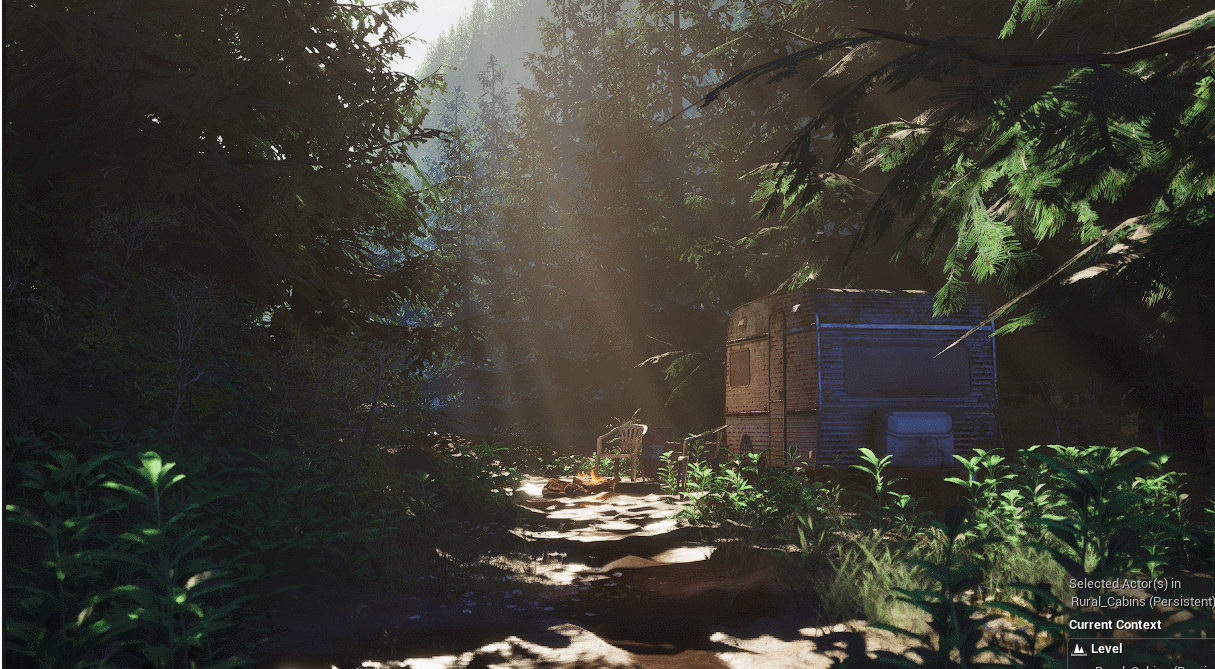
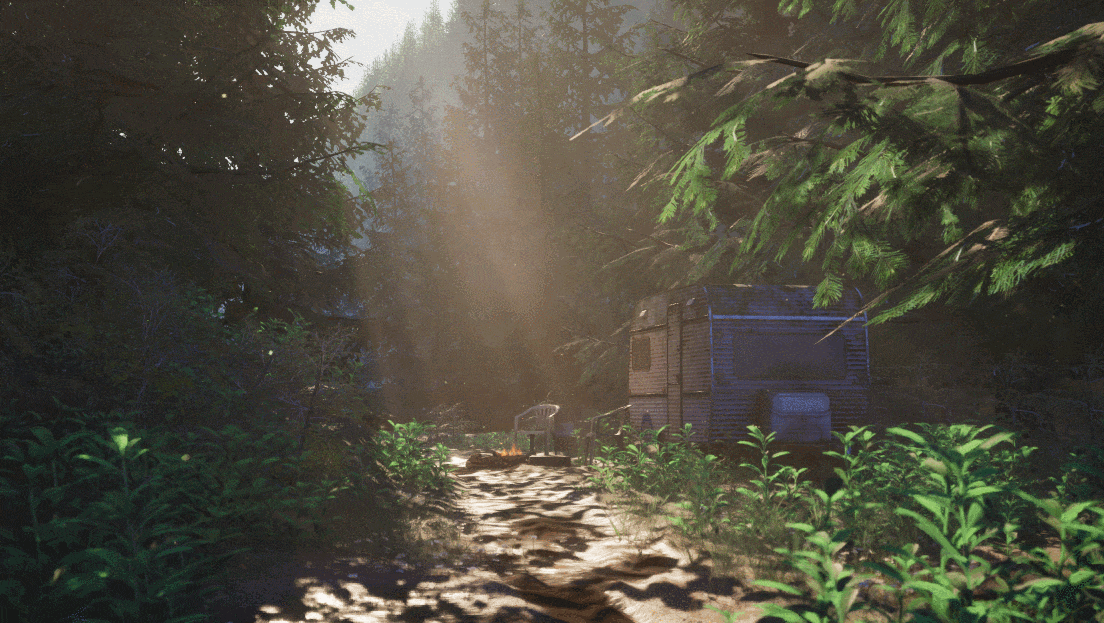
The next important thing to consider is the direction of your light. God rays are essentially light that filters through the fog. Since it’s occluded in certain areas, it forms rays.
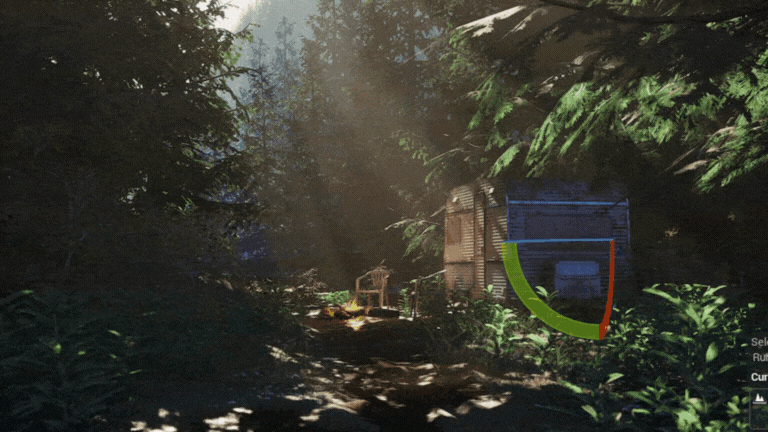
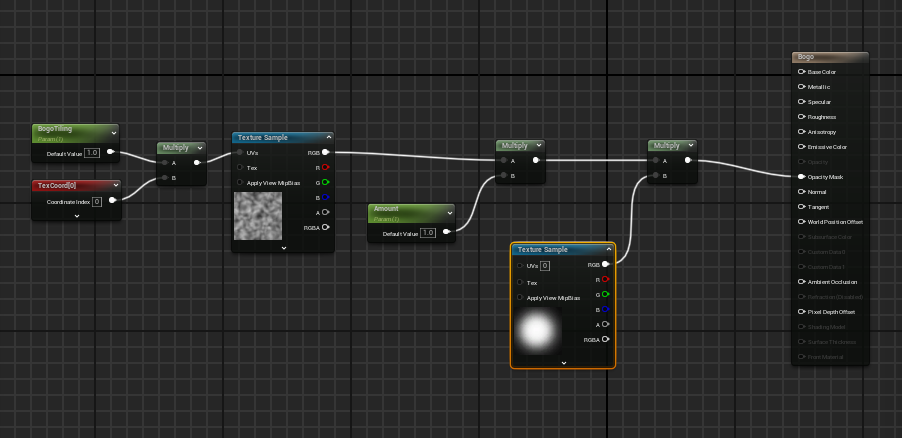
I tweaked the position of the trees to get a nice result. I also created a mask to add more detail to the god rays. The mask is just a simple 3D surface with a special texture applied to it. This noise texture controls transparency, going straight into the opacity channel. I only added a multiply setting to control how much light goes through, and a soft mask to ensure there are no hard edges. The size of the noise is adjustable.
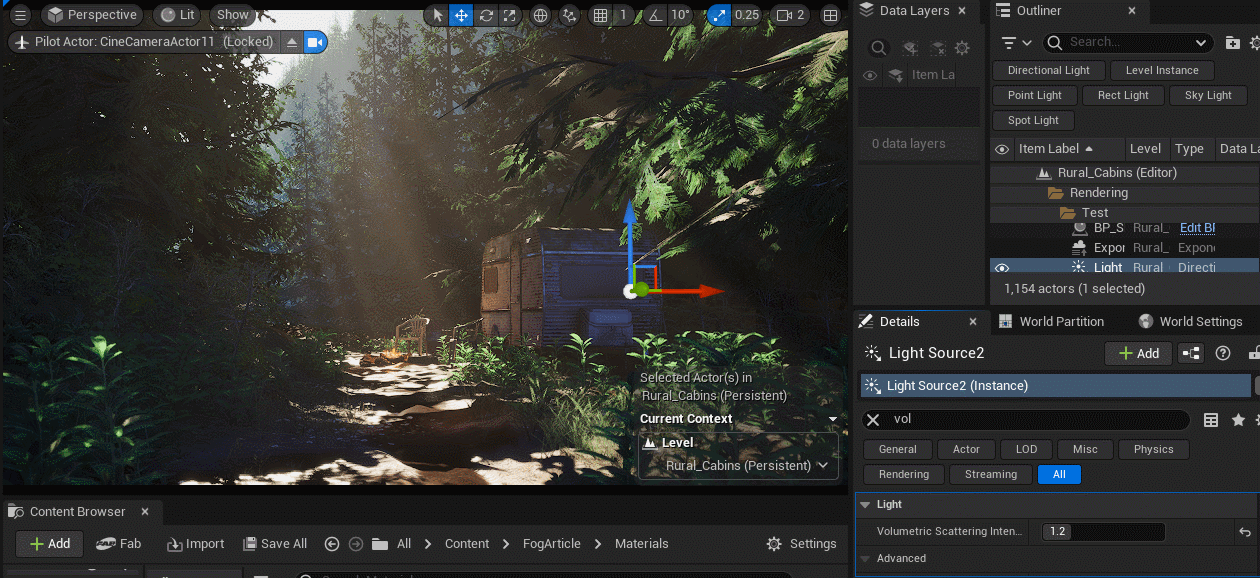
Another setting you can look into is the Volumetric Scattering Intensity on your directional light, which makes your god rays stronger.
To add some movement to my scene, I did the following three things:
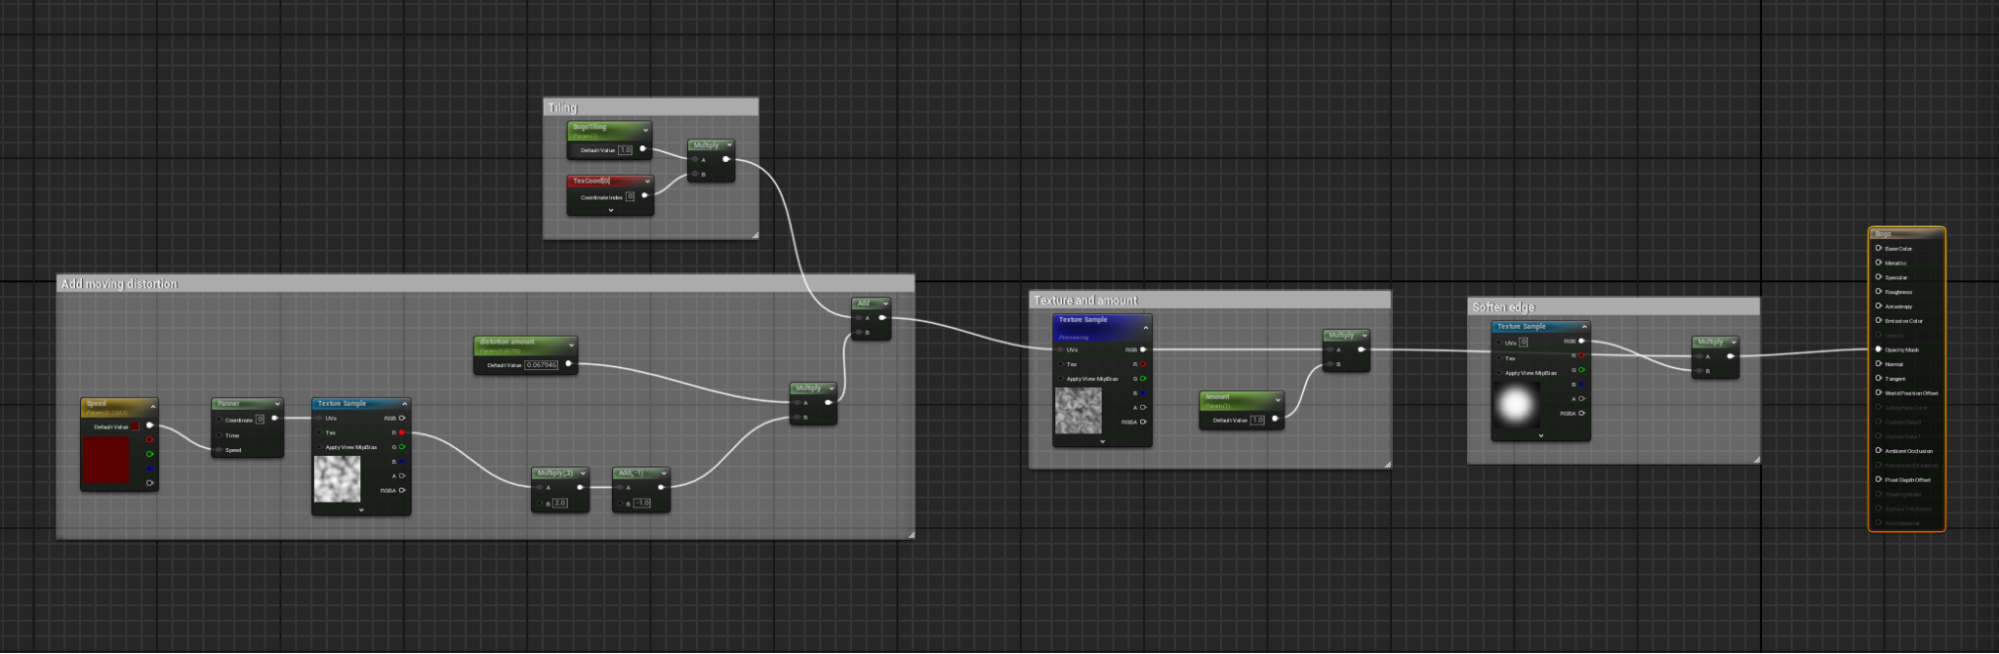
First, I added a moving distortion to my mask for the god rays. It’s subtle, but I think it adds a lot!
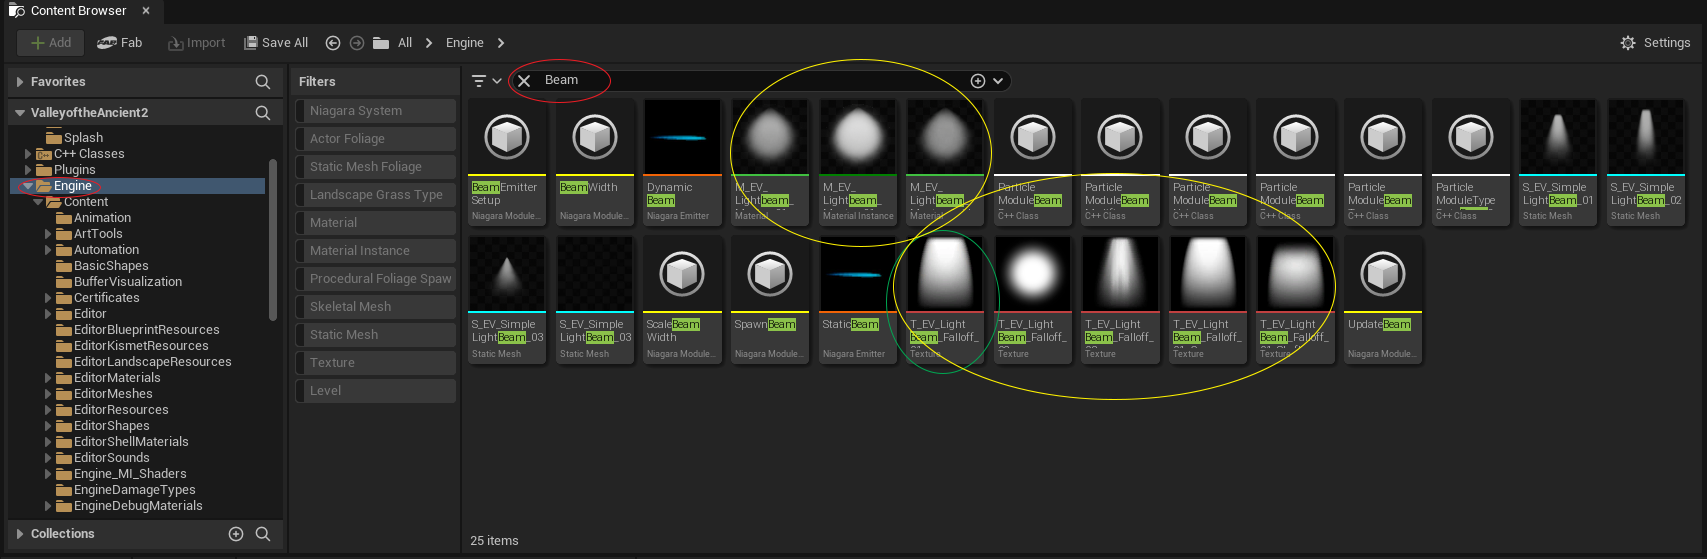
Next, I added a god ray card that’s included with the engine.
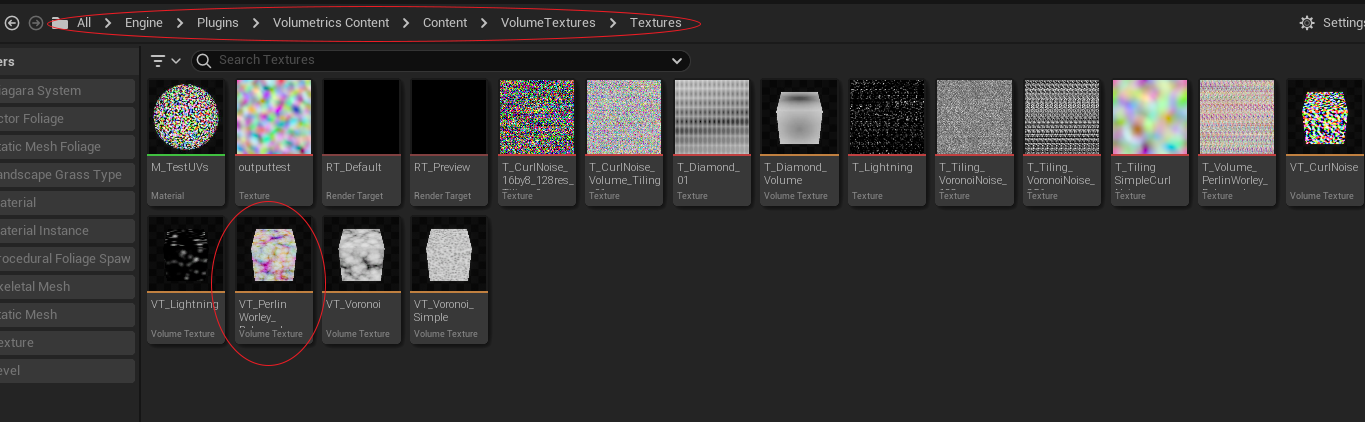
When you go into the engine folder and look for a beam, you’ll find there are a lot of things that just come with the engine. I’ve circled the items I copied over to my project folder in yellow, and circled the one I selected for the final scene in green.
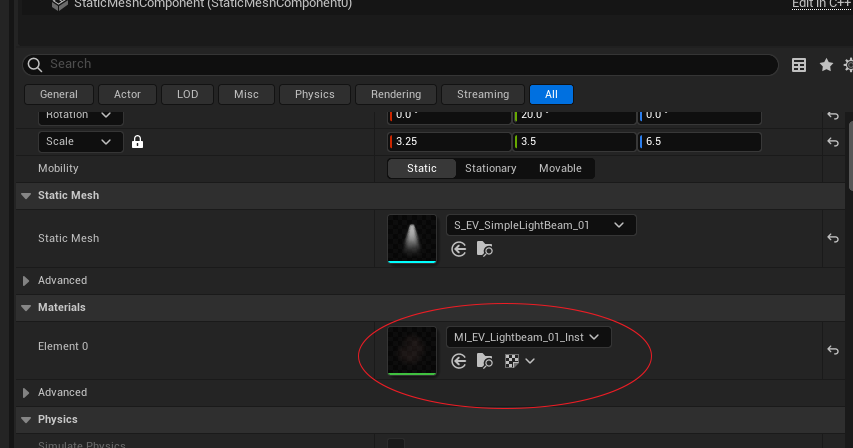
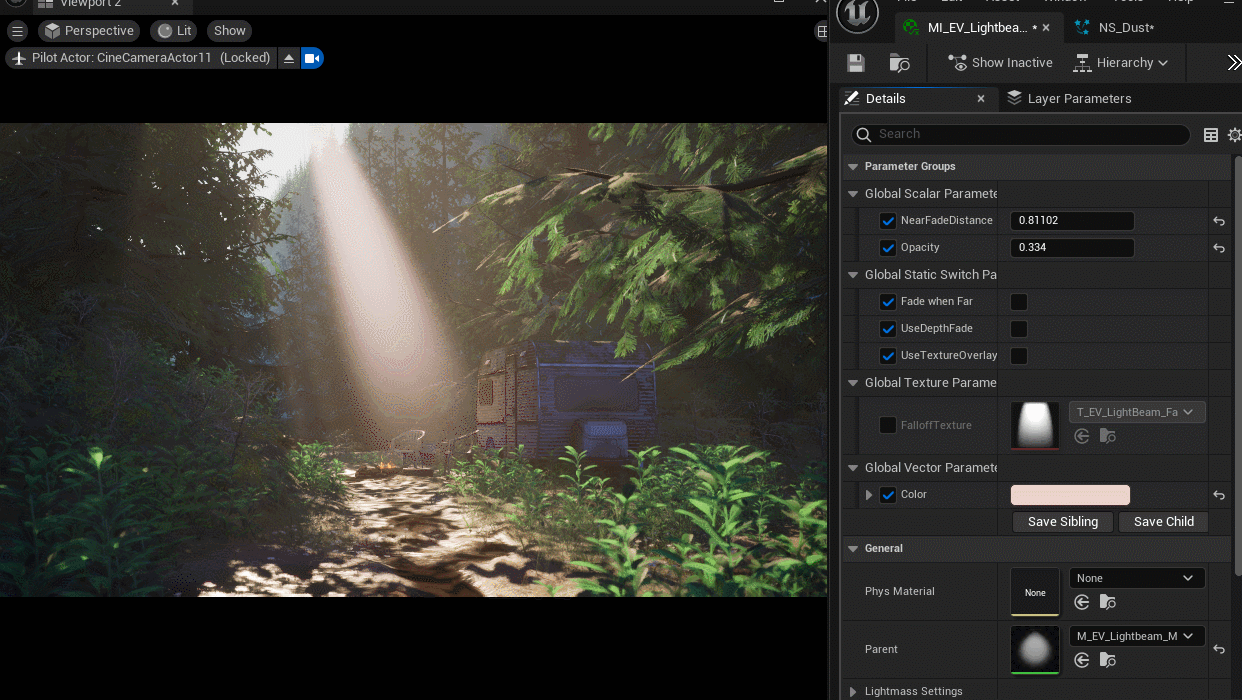
Once you have dragged the god ray into the scene, go to the details panel to find the master material. I created a material instance, which makes it a lot easier to tweak the values. It’s important to tweak the color and the opacity based on your scene.
When you add the texture overlay, you can set a panning speed to add some movement. Again, it’s a subtle change, but you can feel how it adds to the scene.
Lastly, I added a dust spec particle effect. Now I’m no VFX expert, but by following a tutorial and customizing it to my needs, I had it working in 10 minutes – and I think it really helps sell the sense of movement!
Fog cards
The second technique I’m going to cover is fog cards. They let you control exactly which shapes get more definition and what noise blends into the background.
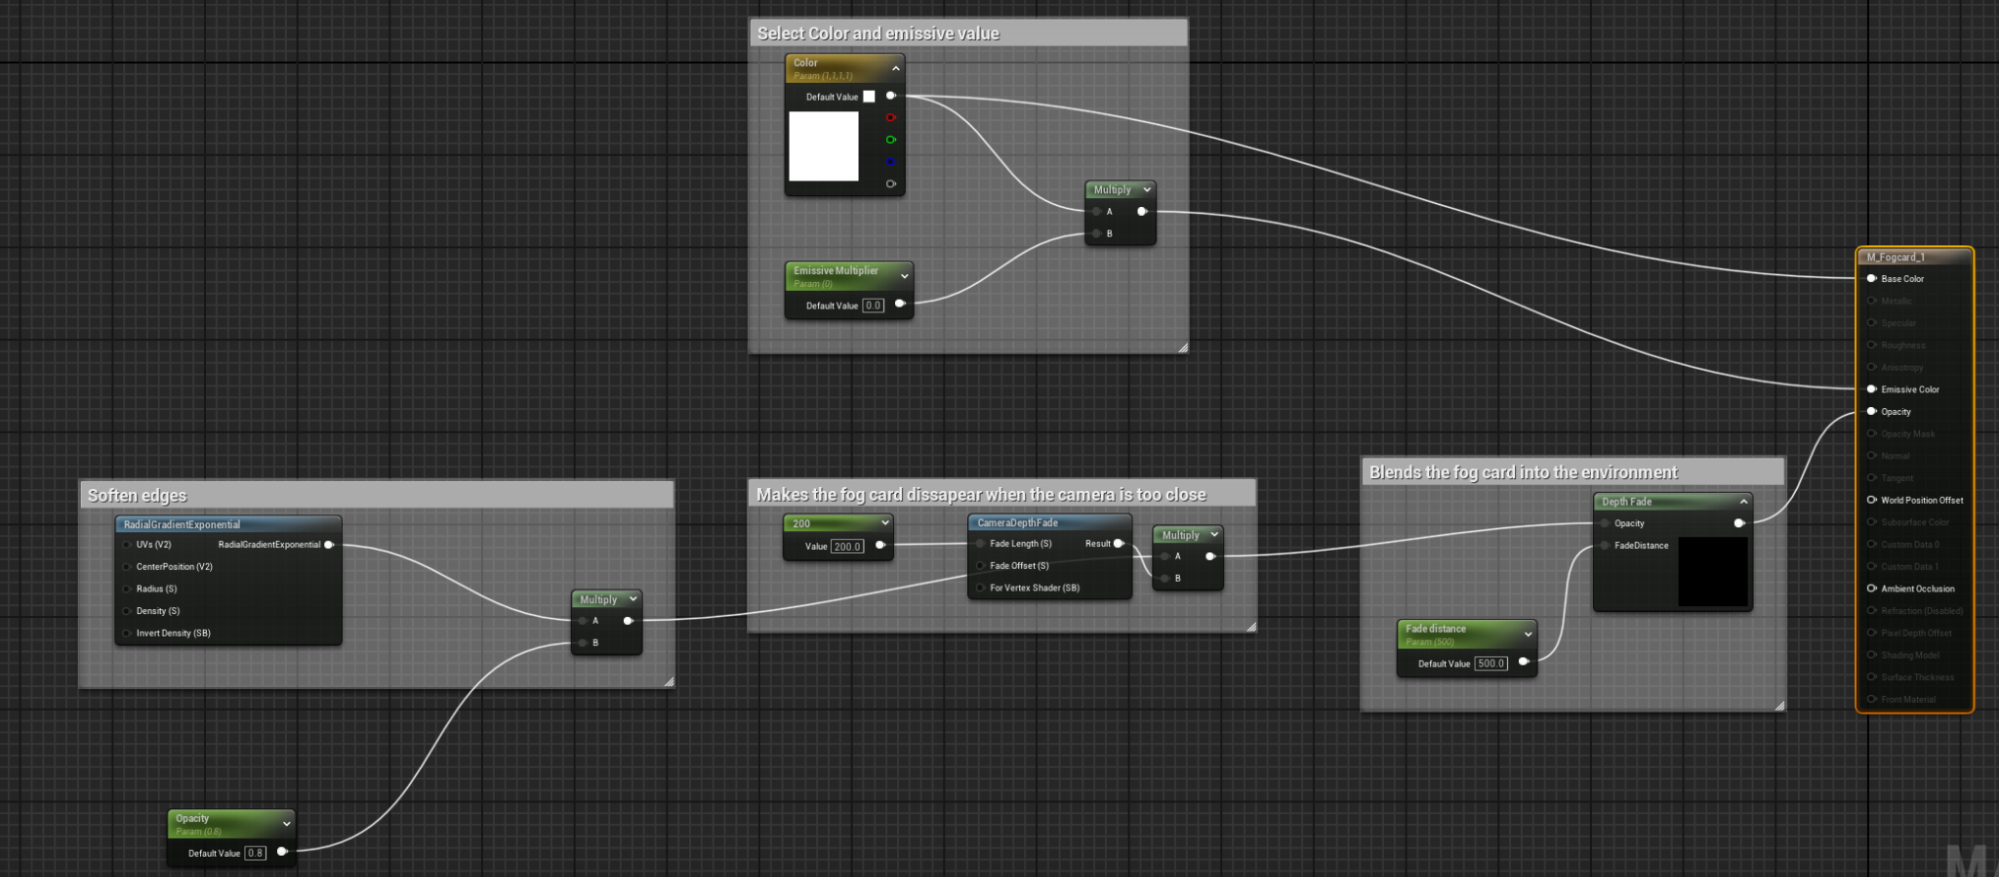
For my scene, I started with a really simple fog card, which was a soft circle that blended into the environment.
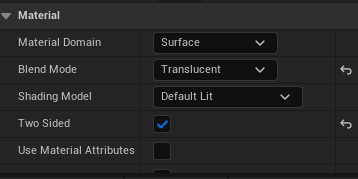
To achieve this, you need to set the material’s blend mode to “translucent” and check “two-sided”.
When you make an instance, you can adjust the opacity, color, and emissive value. Since this is just a card with the image of a cloud on it, the illusion would break if the camera went through it. Therefore, we make it fade away when the camera comes close.
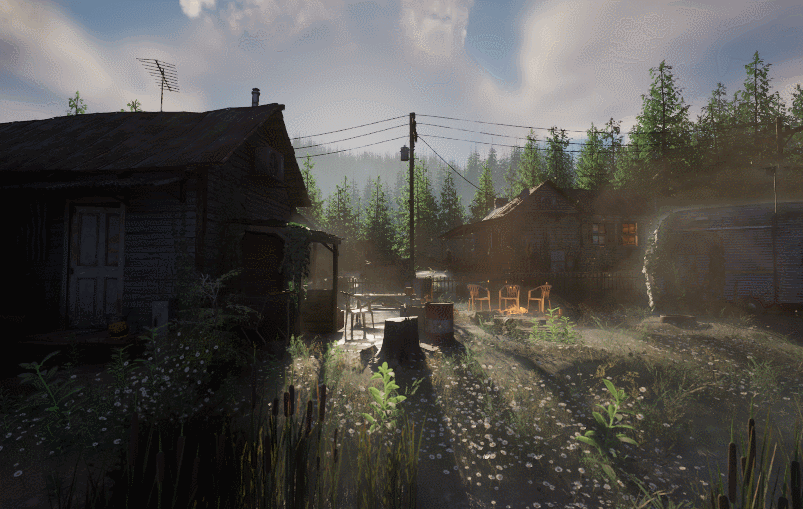
Even with this simple functionality, we can use the cards strategically to shape our scene and reduce contrast behind key elements, making the silhouette stand out more. Here, I’ve placed a few simple fog cards to help define the composition; these cards add depth and draw attention to the right forms. It's still a work in progress, but the overall vision is coming together!
While there's already some atmospheric height fog in the scene, these cards give us even more control. Exponential height fog affects the entire scene, but the fog cards are localized and great for fine-tuning.
Next, let’s add some detail to our fog cards. To do this, I duplicate the same noise texture with a different scale. I then blend them together and add a panner to both of them. You can set the speed to different values to give the illusion of the fog changing shape. I then multiply the created moving noise by the opacity. I added a lerp, so we can interpolate between just having the mist or the moving noise, because we want control of how much noise we get. I also added the object position to the texture coordinates, that way, every fog card looks unique, based on its position. We don’t want all our fog cards to have identical noise.
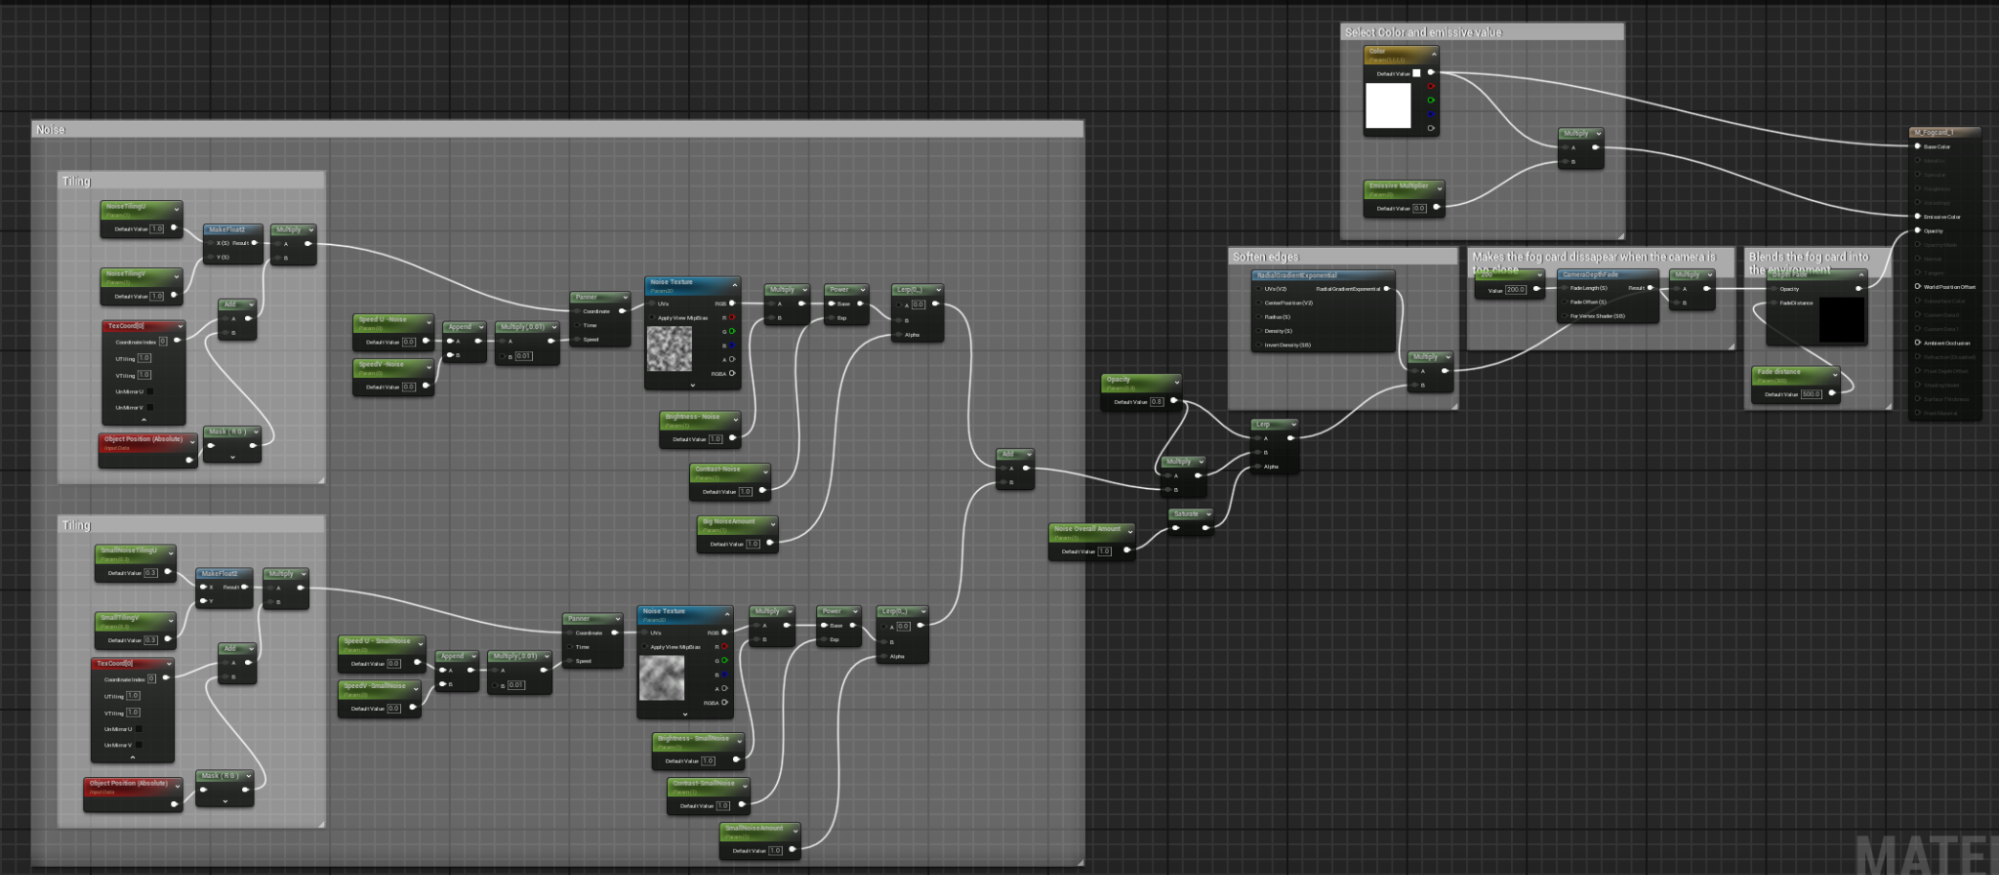
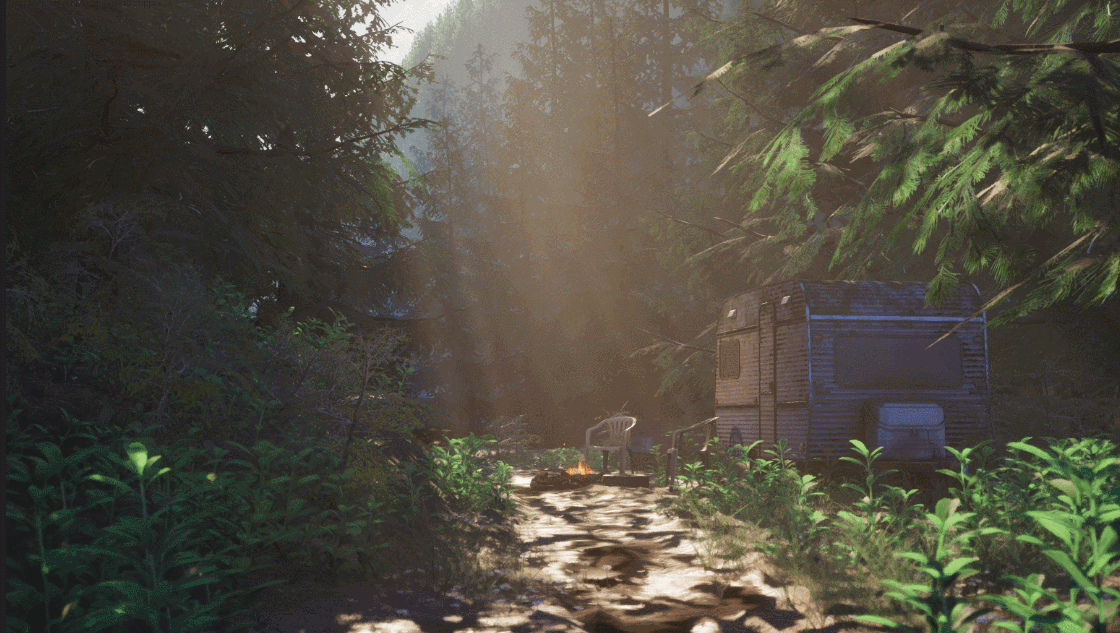
In this image, you can see the updated lighting, improved water, and there’s also a little more foliage. But most importantly, our fog now has texture and movement. It’s a bit intense at the moment, but this is to make it easier to see how it behaves.

The fog has detail and movement now, but is still lacking depth.
To add depth, first change the lighting mode of your material to “surface translucency volume”. Note that this makes the material a bit heavier to render.

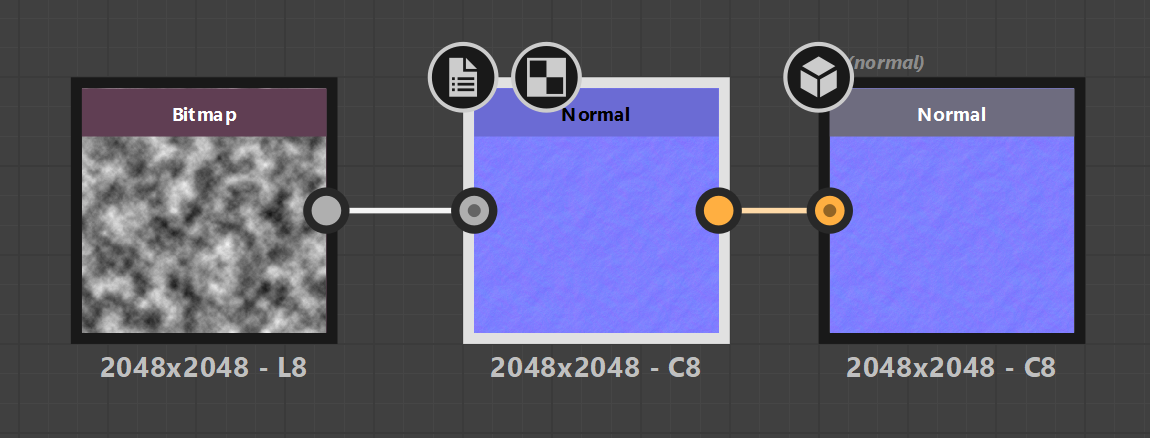
Export the noise texture and use Substance Designer (or use a similar package ) to convert it into a normal map.
Then copy the same logic for the panner of your noise texture and apply it to the normal maps, though there is a key difference to note!
Normal maps are controlled by the Normal Flatten node; if you want to make it stronger or weaker, you need to use Blend Angle Corrected Normals to blend the normals instead of a lerp.
Other than that, the logic is very similar.

Here, you can see how the fog now updates when you move a light around, as though it’s an actual fog cloud with volume instead of a flat plane.
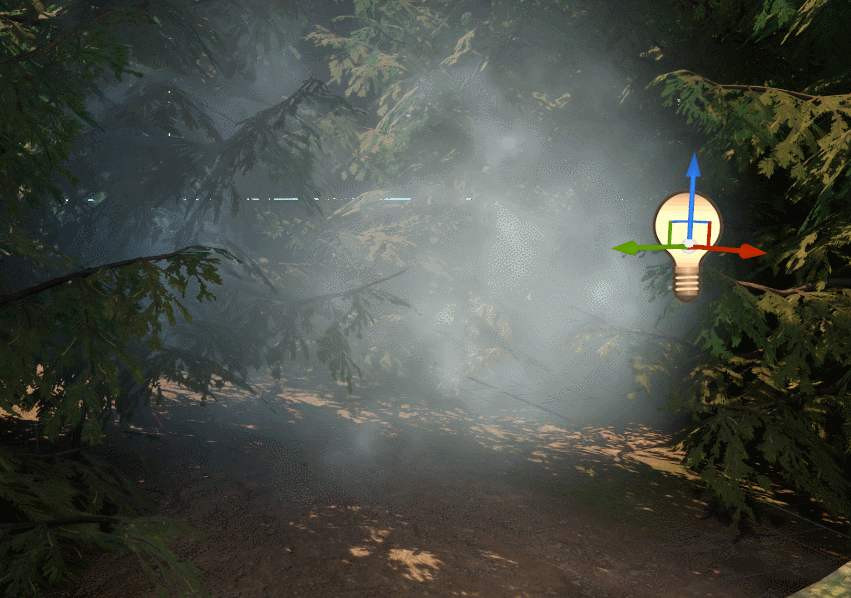
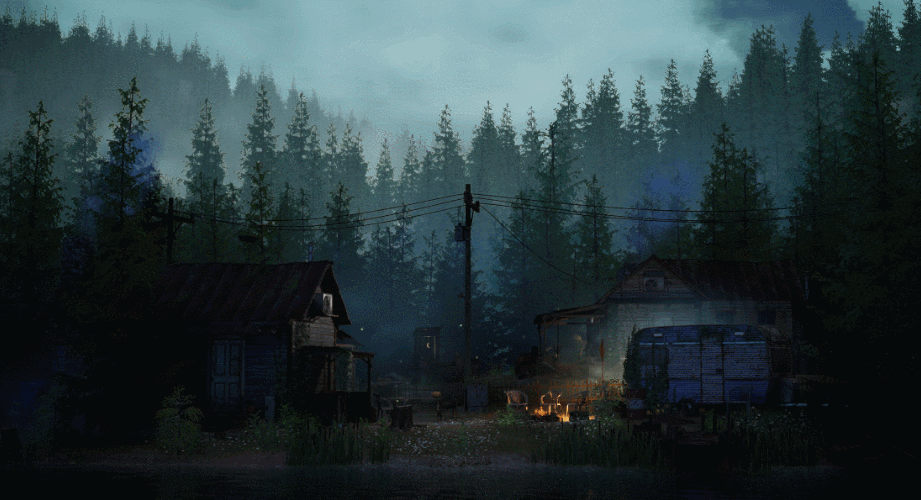
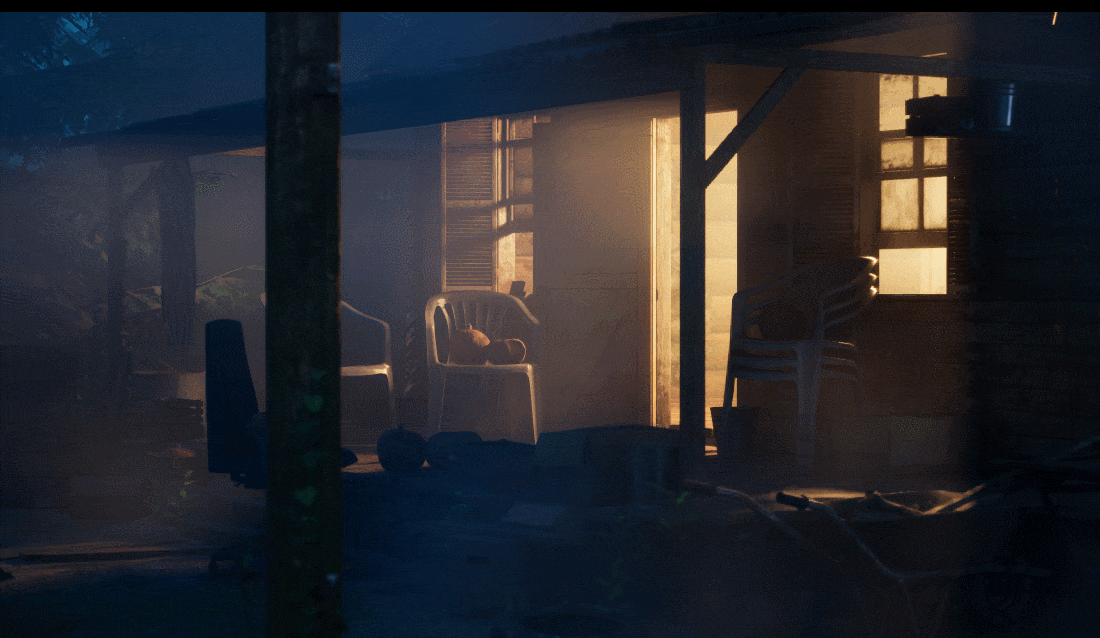
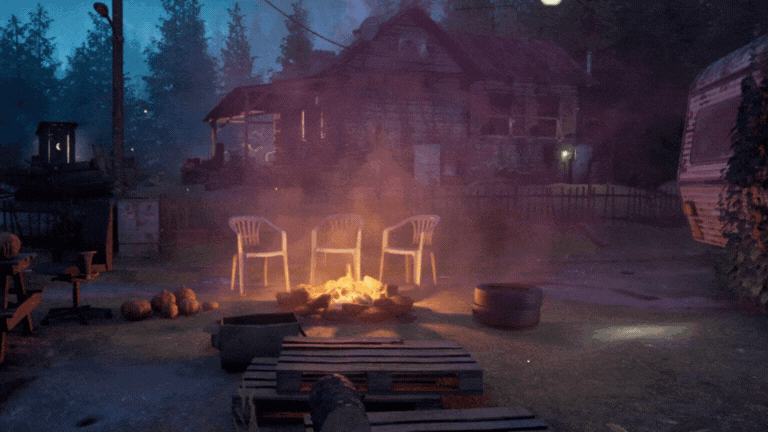
Here’s the scene with our new fog. The chimneys are lit and the dust effect from the previous chapter has been reused. I’ve also added the fire to highlight how the fog responds to that type of lighting.
For the best results, it’s important to create a material instance and tweak the values of your parameters to the look you want.
I personally like to arrange them into groups, so it doesn’t become too overwhelming.
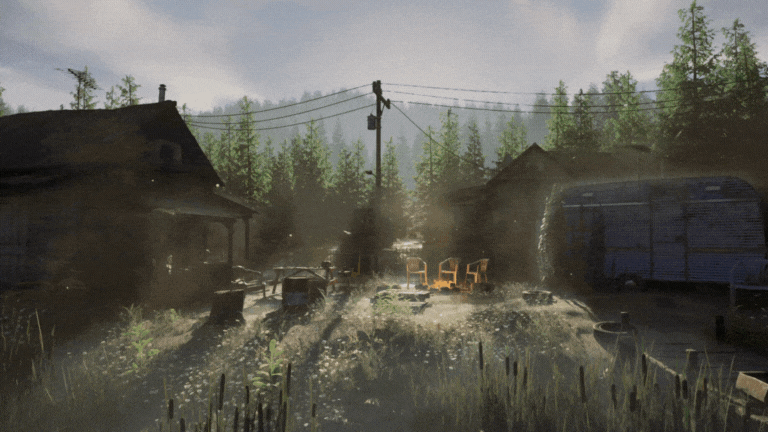
To bring that point home, here’s what the scene looks like when you rotate the directional light. You can see that the fog works well in different lighting scenarios. This is especially handy when you need a scene to work for multiple times of day!
Fog volumes

Fog volumes can be super handy when you want to feel up close, surrounded by fog, but only in one local area – they allow you to control the fog in a given volume. Within that volume, you can give the fog a cool shape, use noise, make it move, control the density, and even make it cling to surfaces.
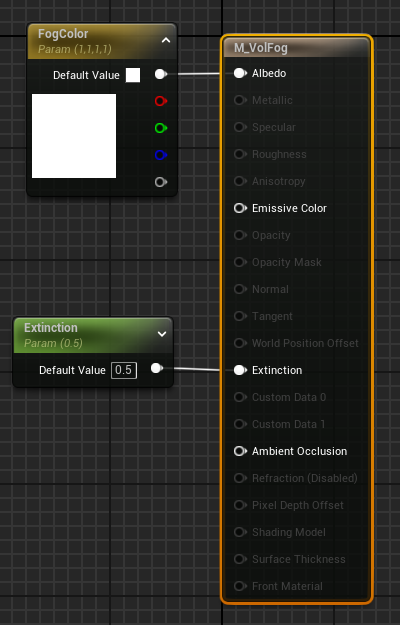
To get the simplest fog volume, create a material, then set the material domain to “volume” and the blend mode to "additive". To start, I’ve just put a color for the Albedo and a value for the Extinction to see what it looks like initially. Note that you still need an exponential height fog in your scene with volumetric fog “on”, for the fog to work.
Apply the instance of your material to a cube, then play with the values. You can get a decent result even with this simple setup!
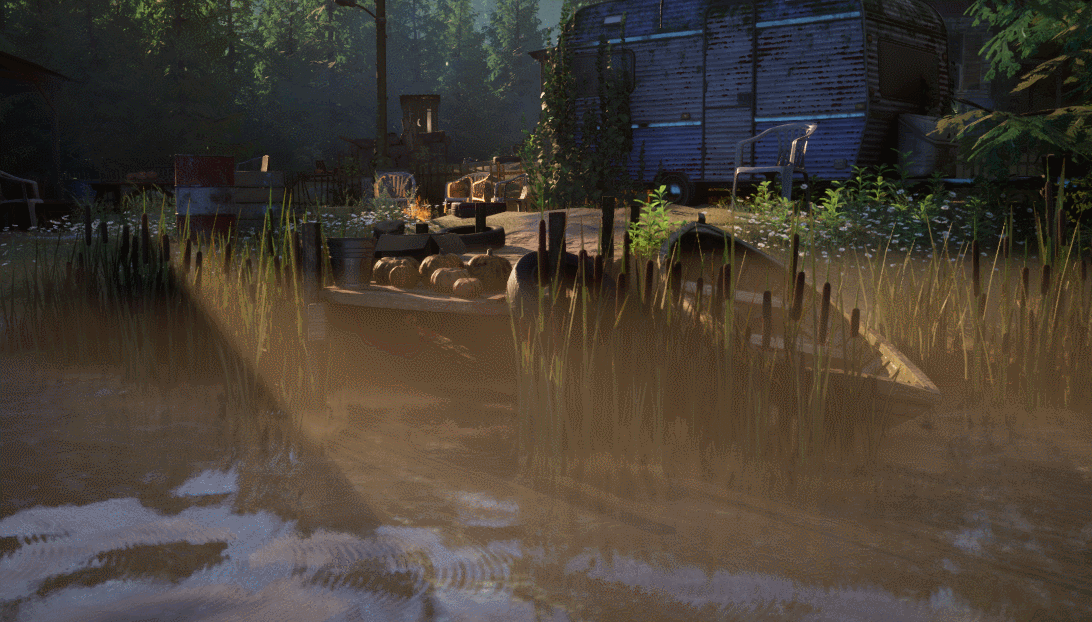
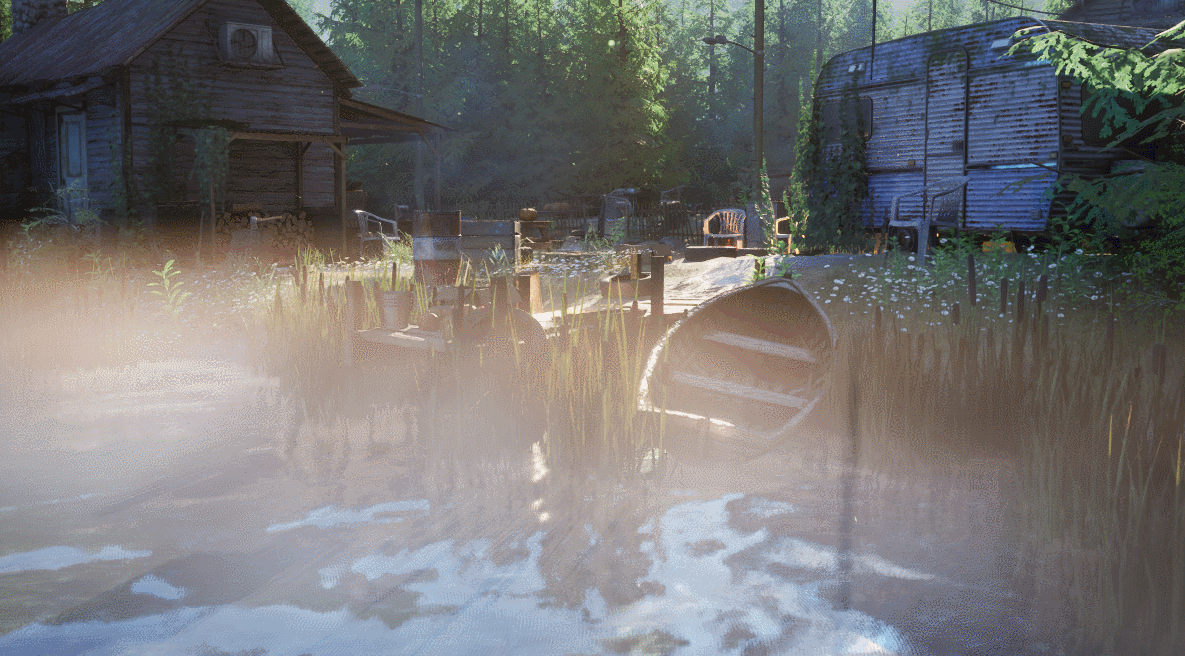
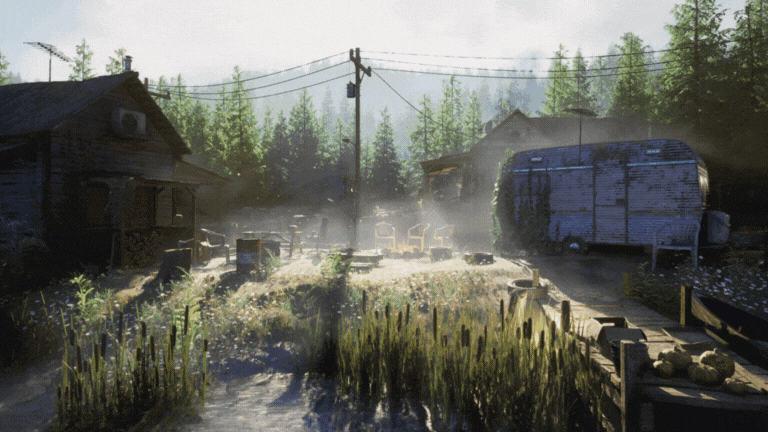
Here it’s used to add some low-hanging fog over the water. Note how the volumetric fog becomes lit by the golden sunlight and gets less visible where the sun is occluded by shadow. It adds depth to the cat tail grass in a way that would be impossible to achieve with fog cards. To get a similar effect with an overall exponential height fog, you would have to flood your entire scene with heavy fog.
But this isn’t ideal yet. The transition when you go under the fog level is too harsh, and there is no definition or movement to the fog at all. So let’s have a look at how we can make it better.
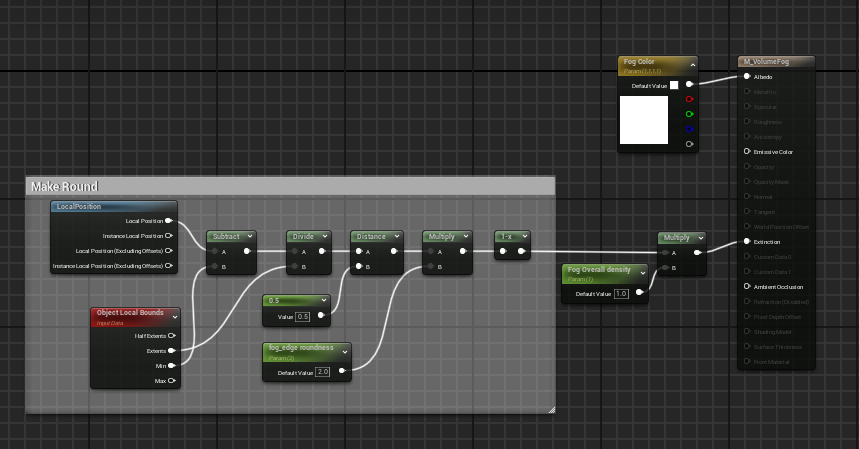
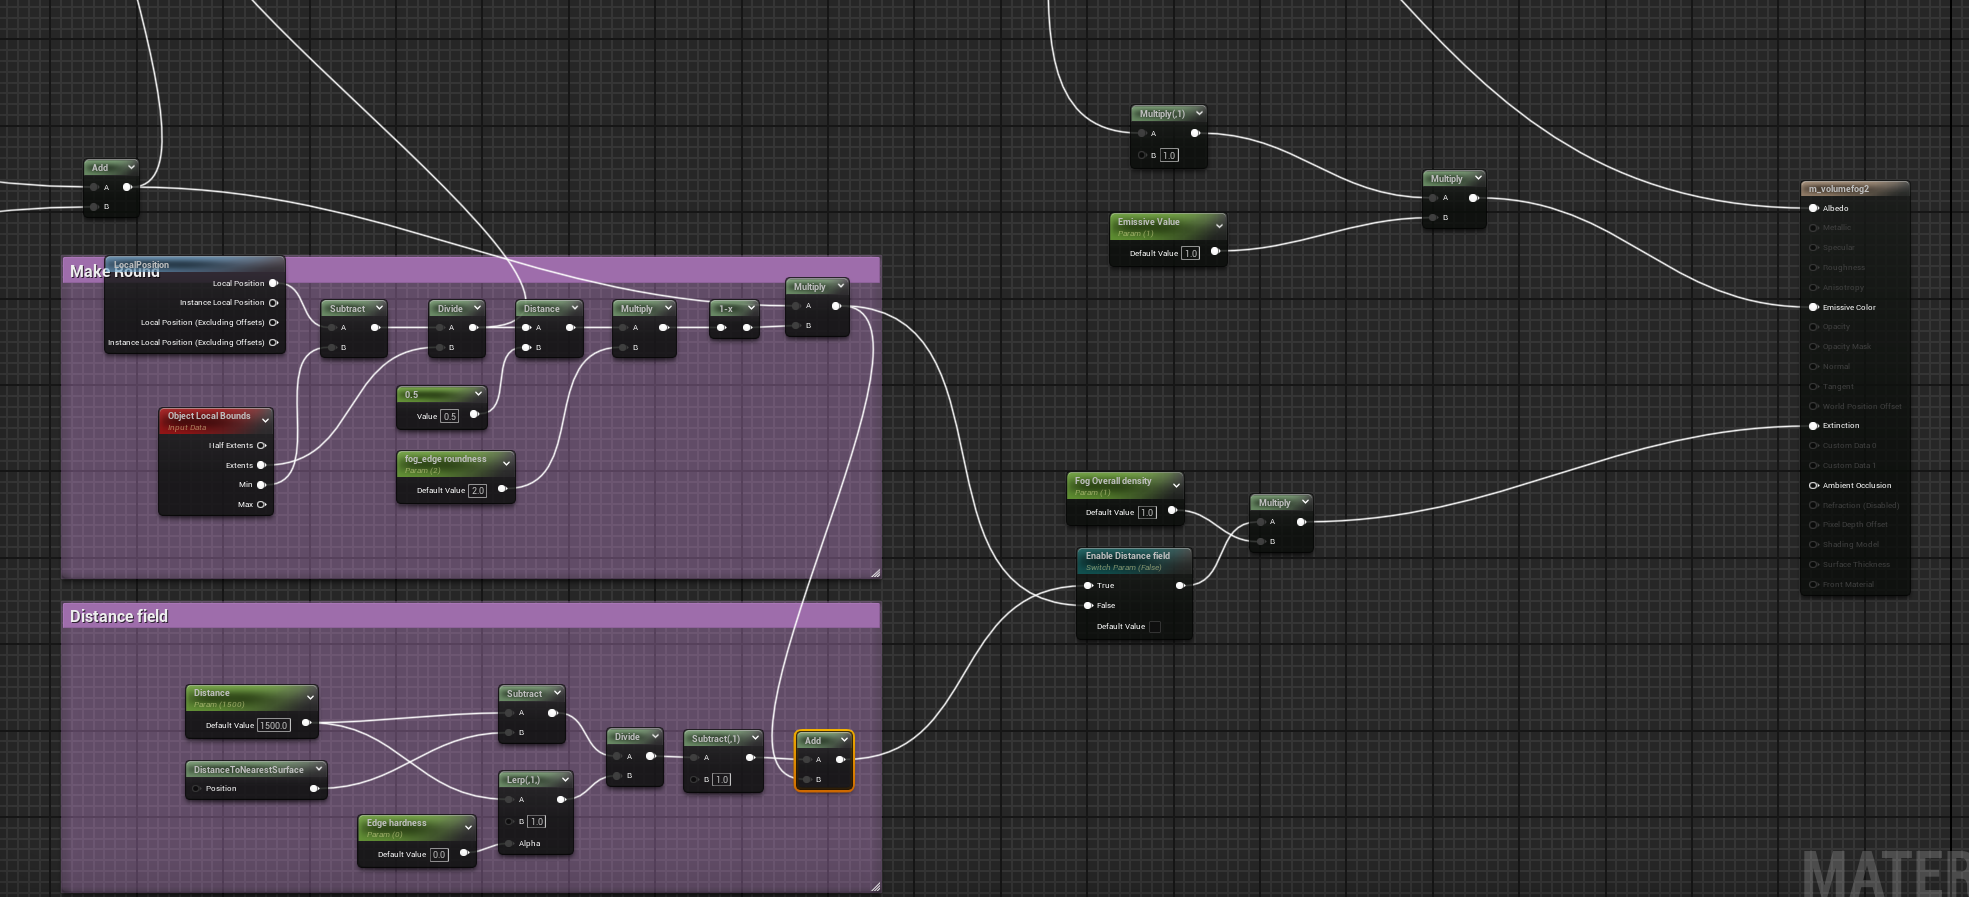
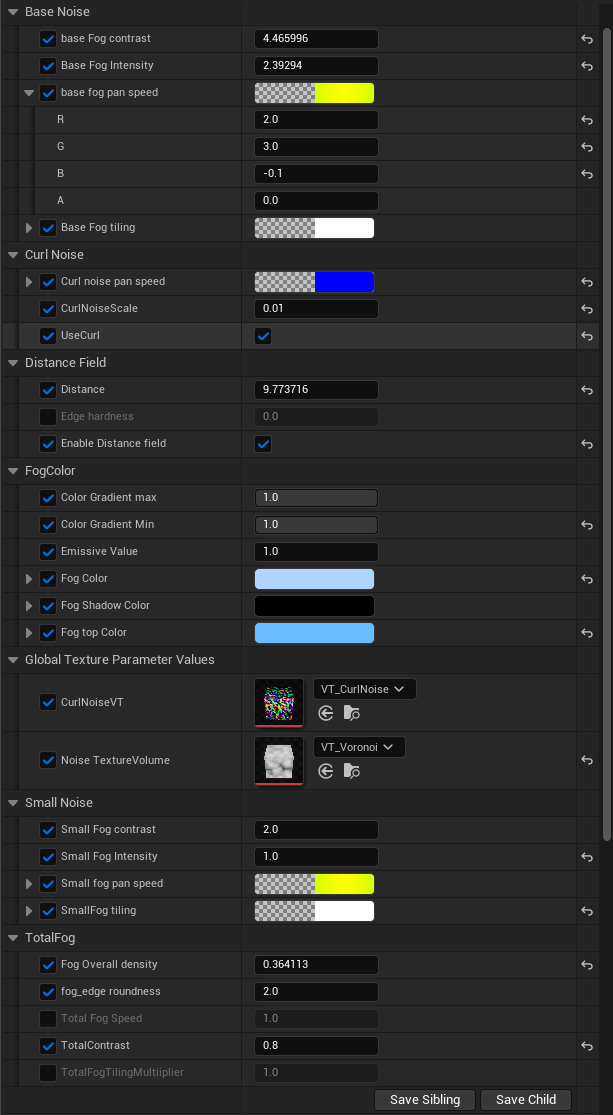
The following setup will round and distort the boundaries of the volume towards spherical, pushing it away from cubic, when the fog edge roundness is adjusted. Here’s how the shader graph works:
The “local position” node gives you the position of every vertex, so if you subtract the minimum position of an object, it gives you the position of every vertex relative to the 0 point.
Divide that by the extent, and now you have a gradient from 0 to 1 in every direction (X=R, Y=G, Z=B).
If we calculate the distance of those values to 0.5, we get a gradient radiating from the center.
We can add a parameter that determines the scale of the gradient.
We have to one minus it because the center of the gradient will be 0. And we want to create a mask that is 1 in the center and 0 at the edge, so we get the full amount of fog at the center.
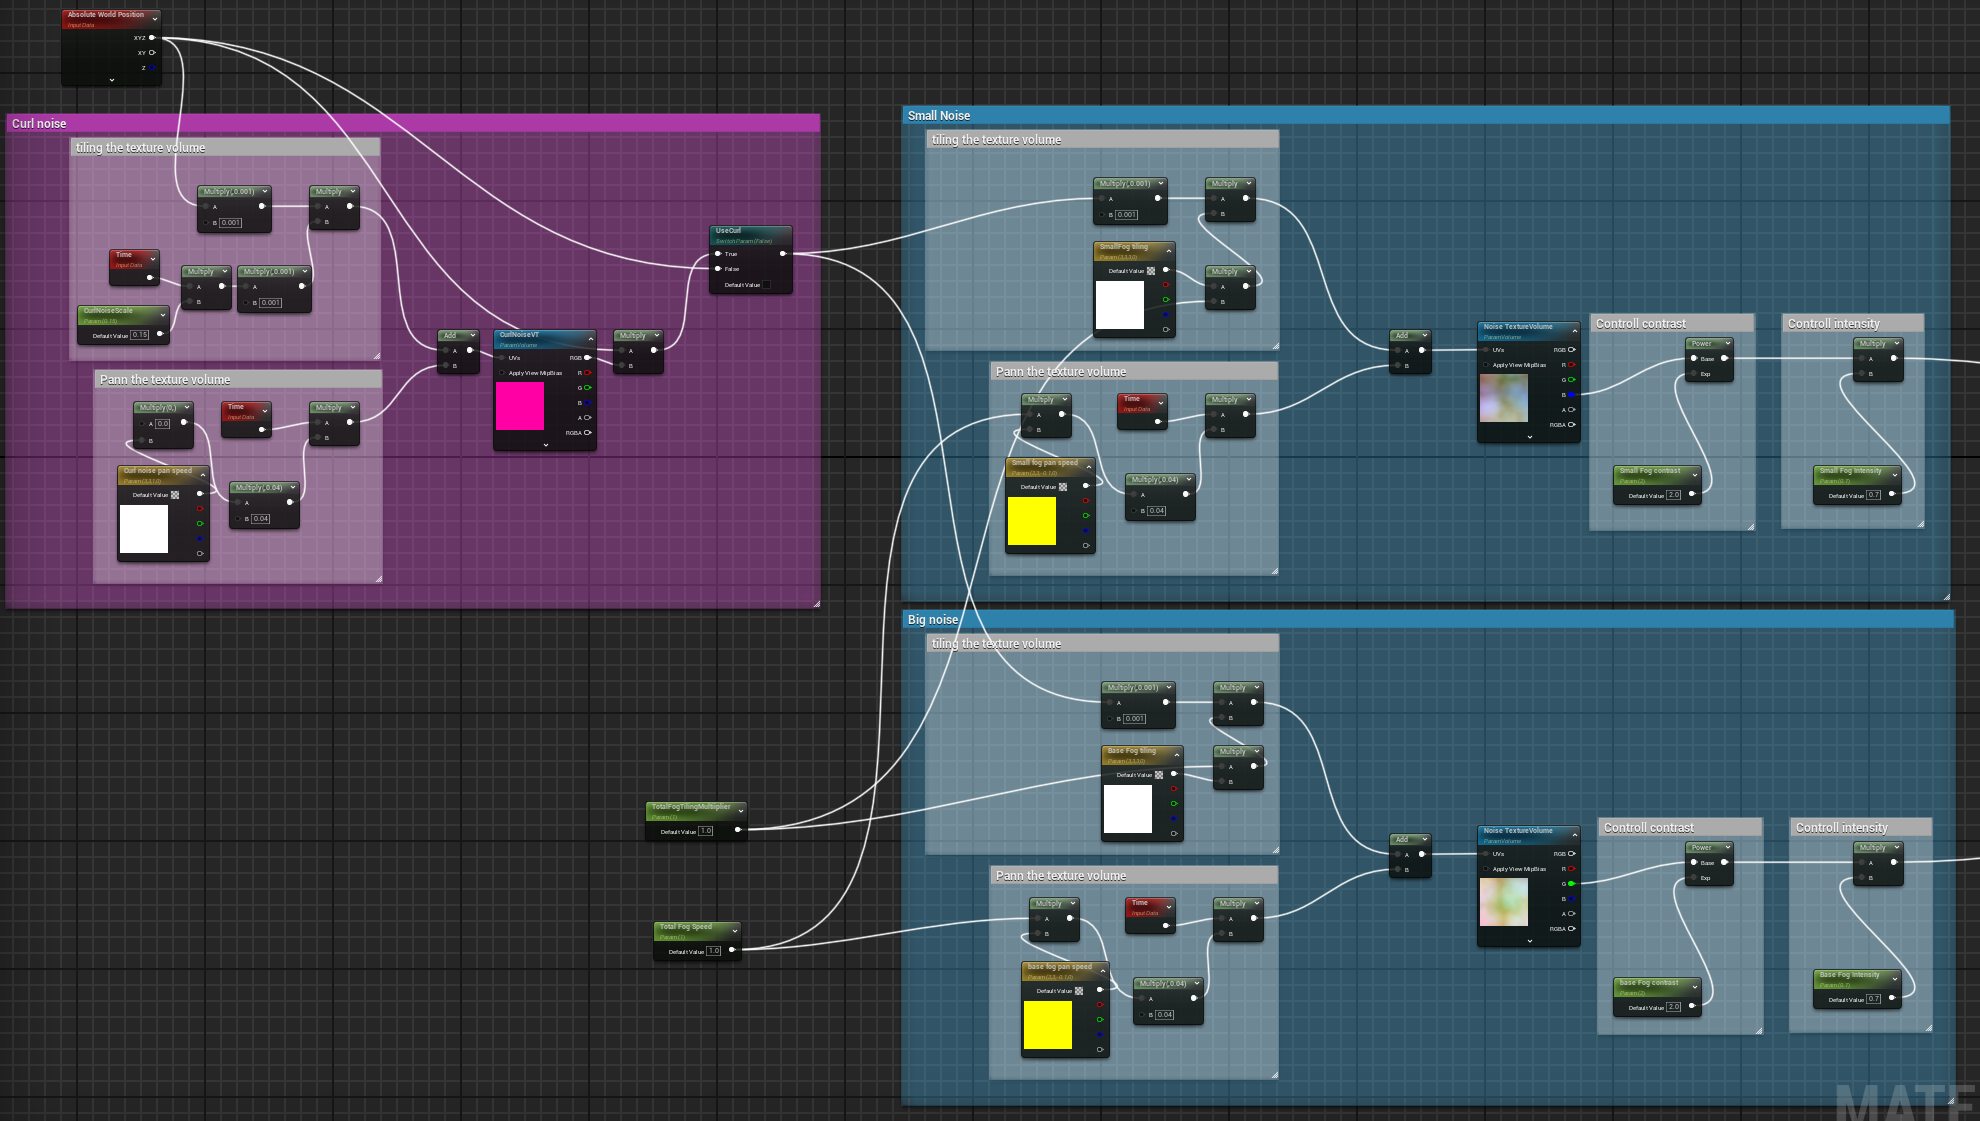
Next, we want to introduce some noise. Since this is a volume, we need a volume texture. Luckily, you can get this Perken Worley noise volume texture from the in-engine content!
To add it to the shader graph, you need to look for a “SparseVolumeTextureSampleParameter” and apply your volume texture. Similar to the fog planes, where we add logic to control the size or tiling of the noise; we add a panner here, now with three dimensions of speed. We use the power node to control the contrast and the multiply node for the intensity.
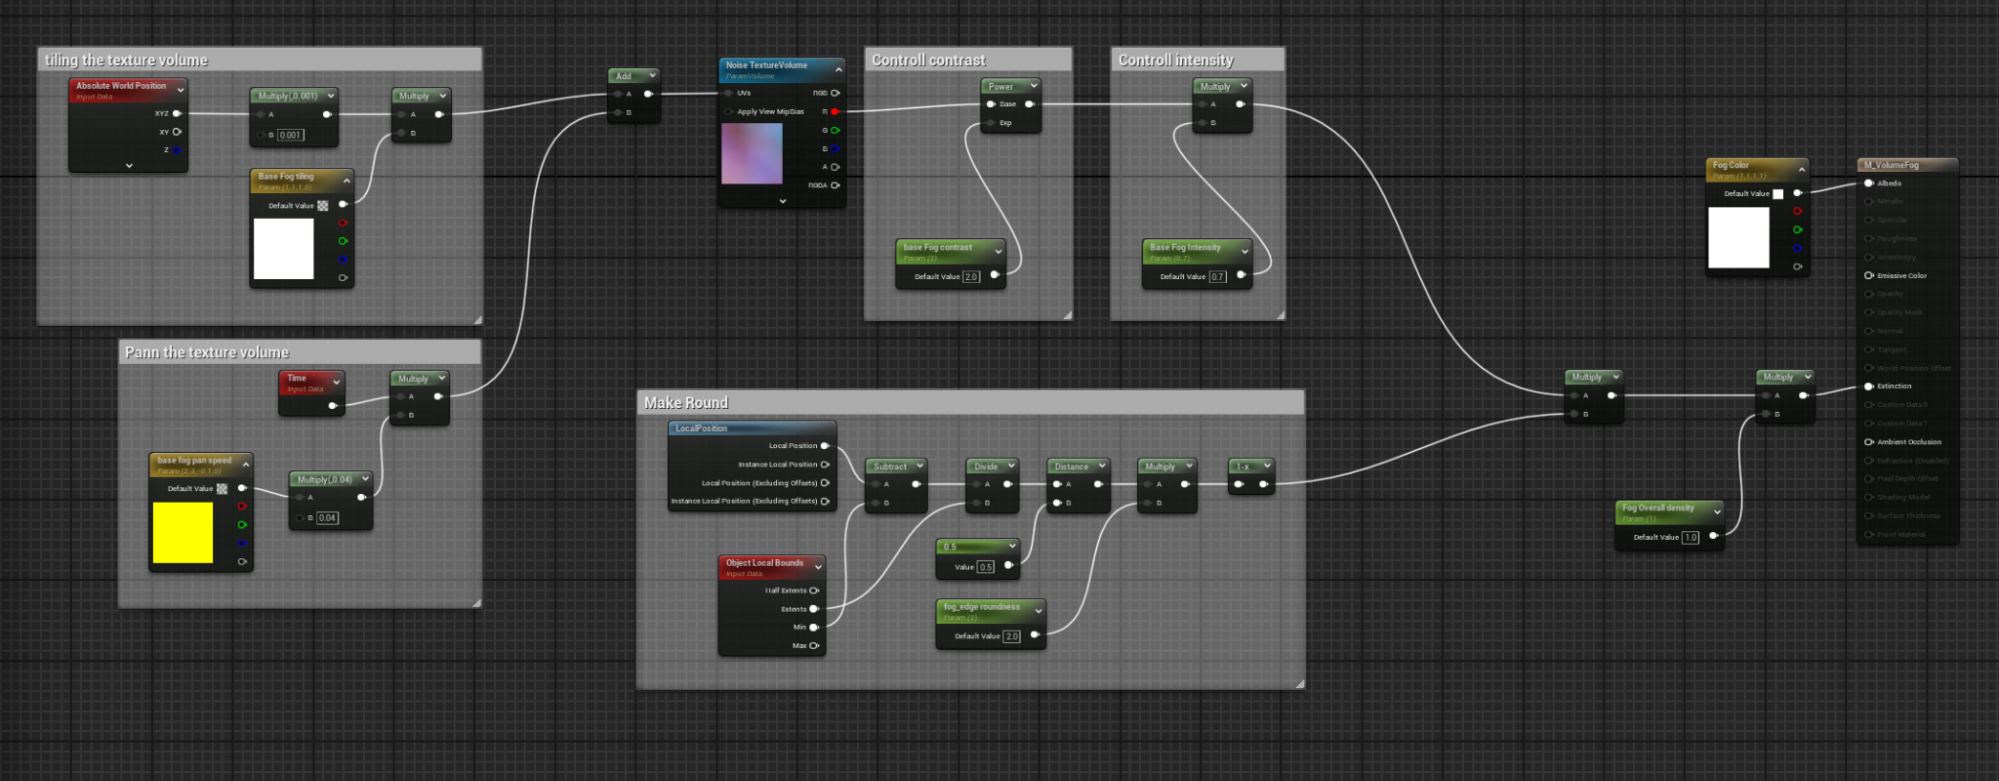
Now when you play with the values, you can get a fog that moves and has some visual variation.
Next, just like with the fog cards, we’re going to combine two sizes of noise together and give them different speeds.
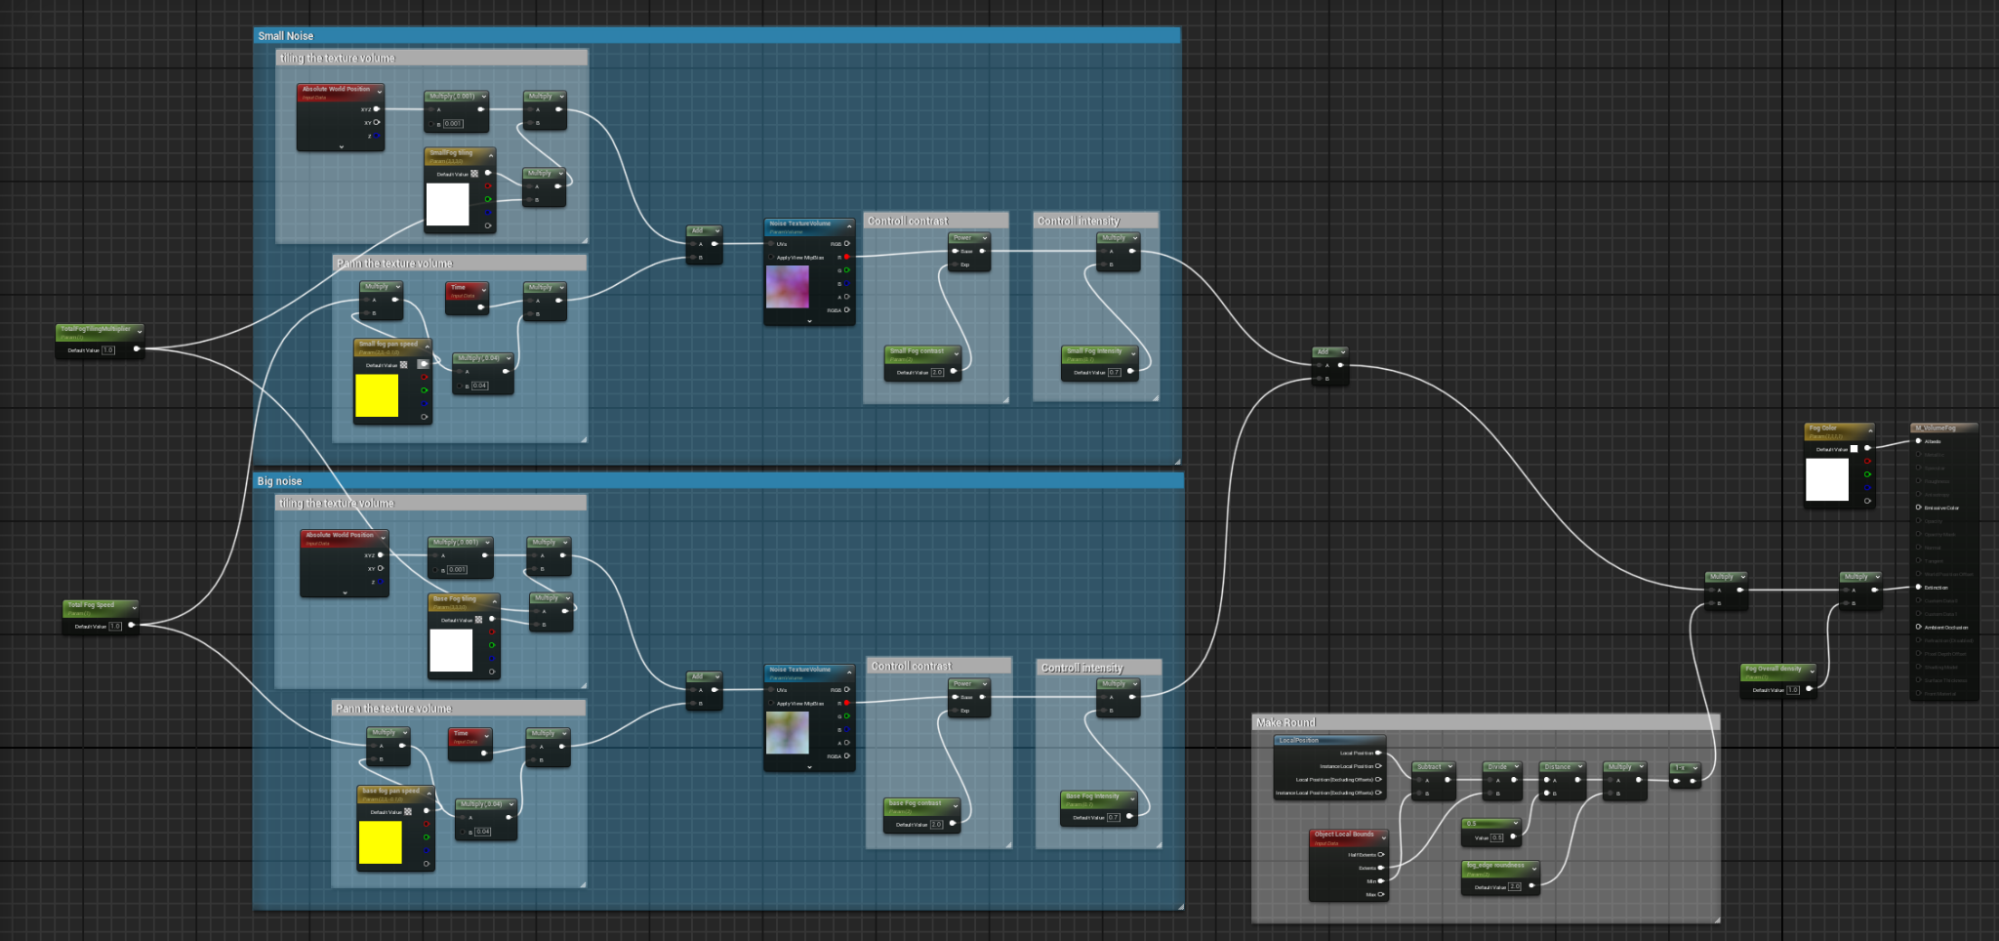
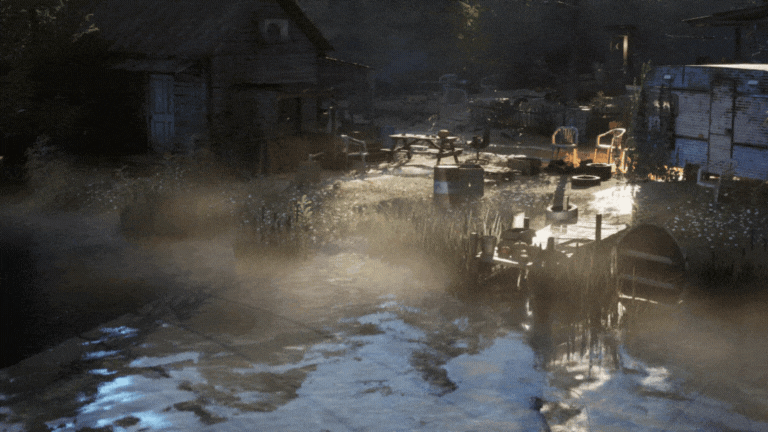
While tweaking the material, I added an extra multiply before the speed and before the size, so I could tweak them simultaneously. And this is the result! I put a spotlight in the house and turned on the “cast volumetric shadows” option.
Note, don’t forget to turn off the collision of your cube!
You can change the voxel size with these commands: r.VolumetricFog.GridPixelsize 16
This will set it to 16, but playing with the value is the whole point!
If you use “r.VolumetricFog.GridPixelsize ?”, it will output the current pixel size in the Output log. When you change the gridPixels this way, it will make the fog look smoother, but it increases the atmospheric fog resolution for the entire scene, which very quickly adds up and affects the scene optimisation.
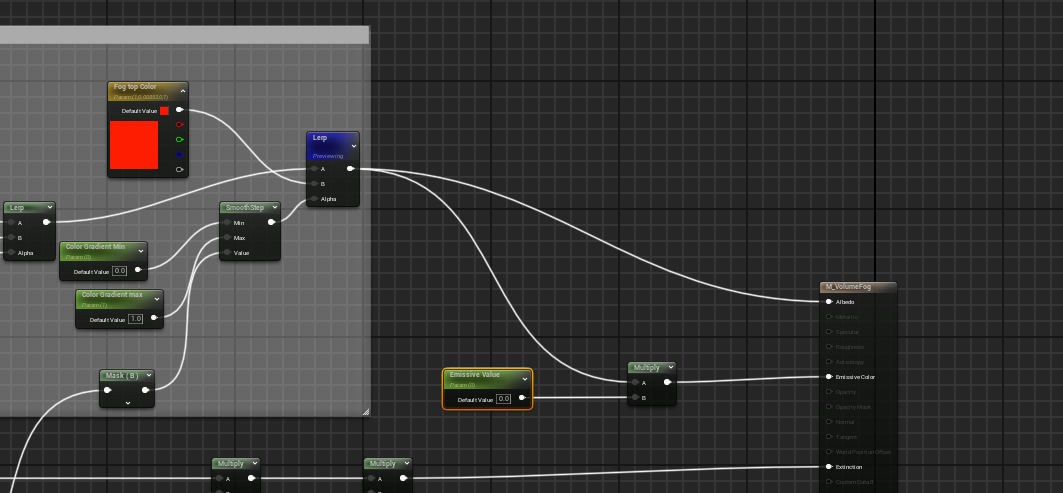
Next, we’ll add some colors to the fog. We can get a different color for the light and shadow of the fog by using a lerp between two colors, which is controlled by the output of the noise we generated.
To add a gradient to the noise, we can use the B value of our gradient to make our shape. We multiply it by a value that will determine the spread of our gradient, and then use a smoothstep node to create a nice interpolation. 2 parameters, between 0 and 1, will determine where the gradient will begin and end.
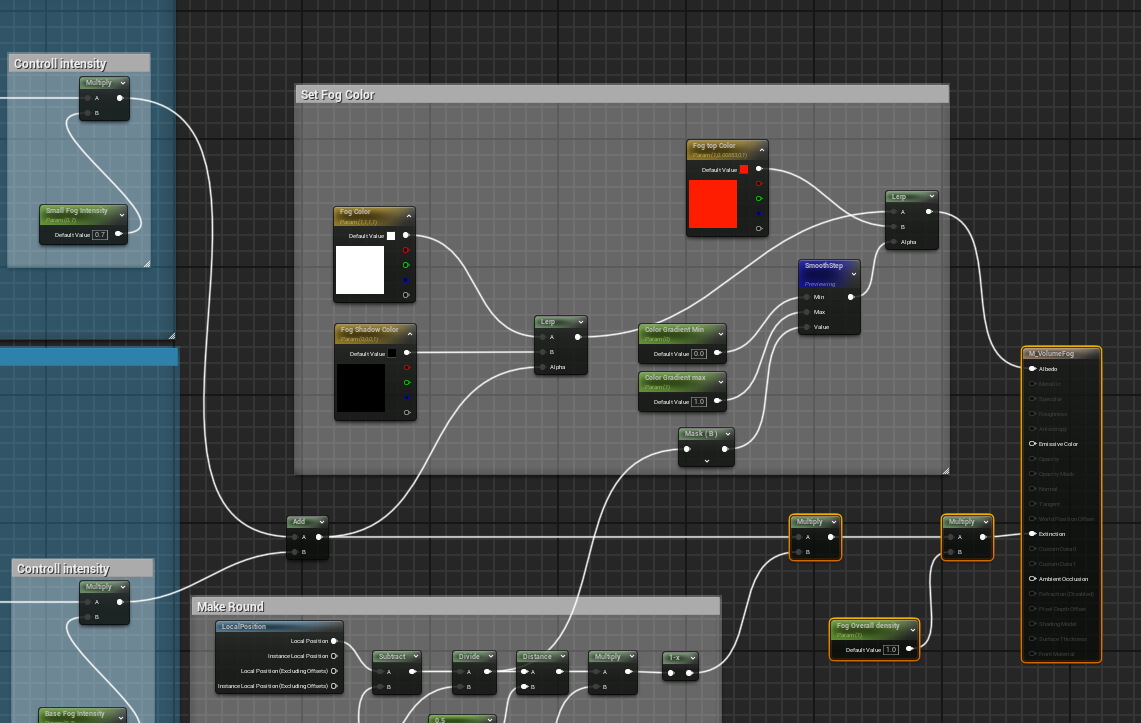
In this gif, you can see how I’ve used the new gradient functionality to make the top of the fog orange and the bottom blue. It makes it look like the bottom part of the mist is cool from the water, and the top part is warmed by the sun.
You can also add an emissive value – just multiply it by the base color. This is mainly for when the fog is in the shadow or in the dark, as it can disappear otherwise. Since I quite like the volumetric shadows to do their thing, I usually leave it at 0, but it can be handy in certain situations.
The next step is to add in another noise. This time I’ve used this “VT CurlNoise” that you can also find in the Engine files. It reuses the panning and tiling functionality of the other noises. We also reuse the absolute world position and the tiling of the other noises, that way they will match. What this does is scramble the noise based on the curl noise, giving us a more interesting, more defined noise.
Using this technique, you can see that the fire is lighting up our noisy fog; the top of the fog has a pinkish hue, which turns to purple blended with our blue night scene, giving a pretty magical falloff.
The next thing to add is the distance field. You can see that I’ve added this bit of logic at the bottom left. We want to control the distance and the hardness of the edge, and then add that to the current opacity. There’s a switch to control if we want the distance field or not.
When we turn that switch on, we can see our fog wrap around the meshes of our scene, which looks very natural.
As with the fog planes, it’s super important at every step to tweak the values of your material instance to achieve the look you want.
Here I went for a cool, crisp, misty morning.

VDBs
VDB is a file format that stores volumetric data, like smoke, fire and clouds. It can store different parameters, like density and temperature. It stores the data in Voxels, which control the detail level of the cloud. If we want more detail, we need more voxel density, which increases the size of the file.
You can create VDB files in software like Houdini and Embergen, but you can also download free samples from the Embergen website, which is what I’ve used in this case.
To import them, drag them into your folder structure and select the parameter you want to include. I’ve just included density and nothing else in this case. The engine will convert them into sparse volumes.
To get it in your scene, you need to add a heterogeneous volume.
It expects a material rather than a VDB. To get this material, go under your engine files again, and find your “SparseVolumeMaterial”.

When you create an instance, you can input the sparse volumes you have imported into the sparse volume texture slot
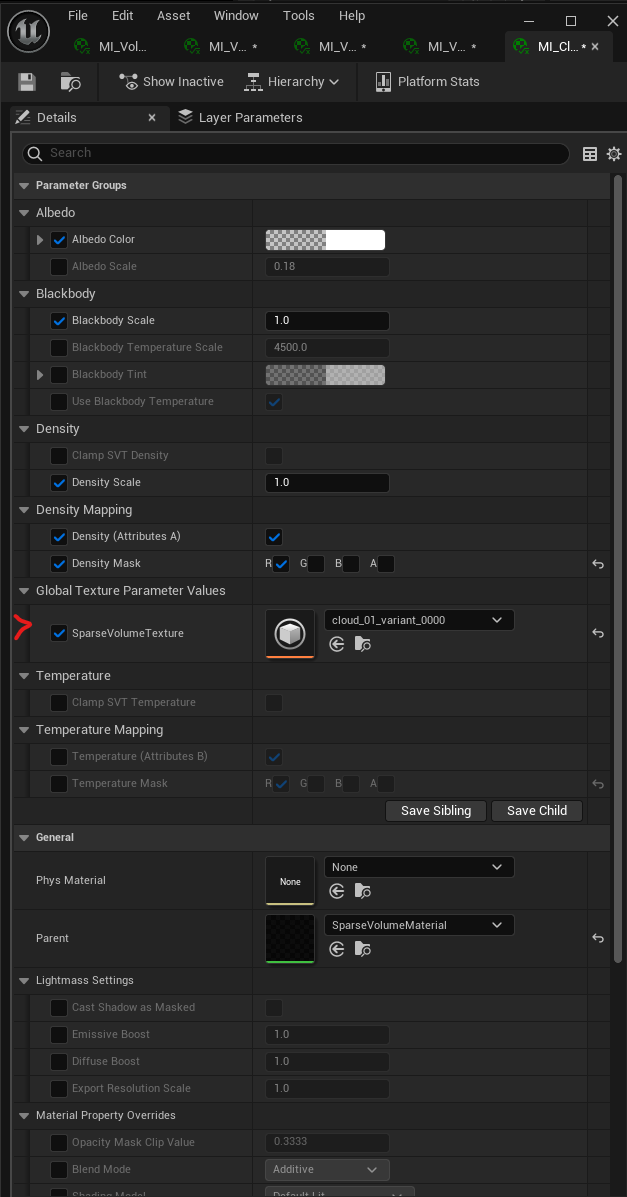
When I first looked at it in the scene, it looked a bit too intense! Lowering the density gave me a pretty nice result, so make sure to tweak the settings to suit your needs.
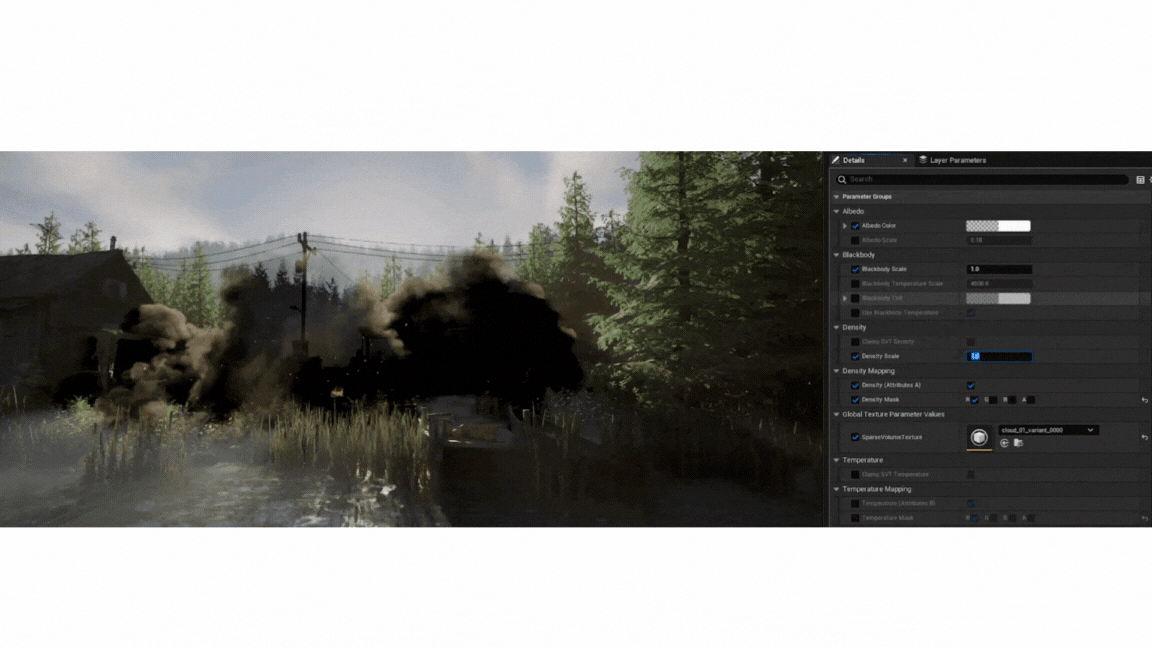
In this case, I used a static VDB texture, but you can use animated VDBs to get very detailed animated fog. The drawback is that it can be very non-performant, so use it at your own discretion and assess whether it’s worth it on a per-project basis.
To conclude…
These are the four main ways to achieve fog in Unreal 5. All of them can be used to create beautiful, moody scenes. Here you can see what a difference toggling the fog on and off has.
Adding these different layers of fog can really help take your scene from good to amazing, so I highly recommend experimenting.
Hopefully this article helped to demystify fog for you!