
An approach to automatic object placement in mixed reality for more tailored experiences

Introduction
We recently worked with Meta to develop an open source mixed reality (MR) “escape room” adventure built in Unity. The objective was to use Presence Platform features to show Quest developers how they can turn any room into a tailored gameplay experience. For this project, we also built a procedural spawning system from the ground up. This allows virtual objects to be seamlessly integrated with the physical room – this is what we’ll dive into in this blog post. For more information on the MR experience, check out the case study here.
Scene Understanding
To place objects in a room, the Quest headset first needs to understand the shape and layout of the room. Depending on which headset you’re using, you’ll need to trace the outline of the walls or scan the room to get the shape of the room, then manually outline and label the doors, windows, and furniture. This functionality to scan and label a room is built into the headset, via the Space Setup menu. The results of the setup are available via the Meta XR SDK. This relatively simple solution to spatial understanding means that it only supports planes and cubes, but does simplify reasoning around the space for developers.

Procedural Placement
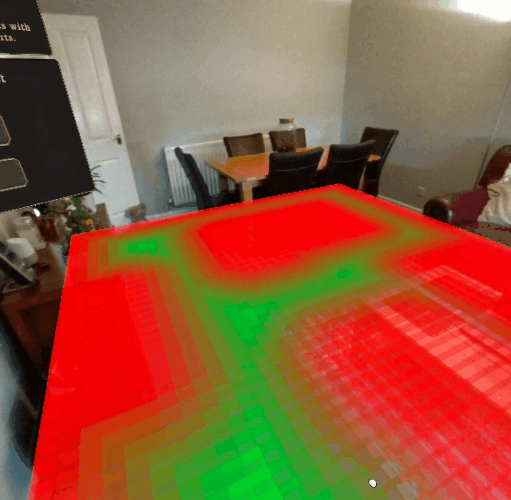
Using the scene primitives returned by the Space API, a 3D grid of cells is generated to cover the entire room and track where scene objects are placed. This allows the room setup system to detect safe locations for placing game objects and minimize overlapping with real-world objects.
Free space in the 3D grid is visualized as green cells, while non-valid locations are shown in red. For example, in the following image, you can see available space in green, but locations blocked by tables, a sofa, and a sideboard are marked in red. As new digital content is placed in the environment more cells are marked as non-valid so digital assets do not overlap with each other.

There are four categories of placement location; “floor”, “wall”, “desks” and “against wall”. “Against wall” objects are the ones that need to be on the floor but also against a wall, for example, a cabinet or wardrobe.
As mentioned, when an object is placed, it blocks out the cells that it covers to prevent other objects from being placed in the same location. As a result, we have to be mindful of the order we place objects depending on the space requirements.
Objects are placed in the following order:
Objects on the floor against a wall
Objects on walls
Objects on desks (if no desks are available, fallback to the floor)
Objects on the floor
Objects on any horizontal location
Within each category, objects are placed in order of size – from largest to smallest. If an object fails to find a safe location, it’s placed in a random logical location. For example, wall objects will stay on walls and floor objects will stay on the floor, even if they are overlapping with other digital objects or scene objects.
Objects that are not on or against a wall face towards the center of the largest open space in the room, in most spaces this should mean that items are placed in ways that users can reach them.
Other methods we tried included:
Facing the user, but the user may be stood off to one corner during the setup process resulting in less ideal rotations,
Or simply pointing at the geometric center of the room. This is also not ideal, as it may be in the middle of a piece of furniture such as a table, resulting in needing to awkwardly lean over the table to reach items.
The center of the largest open space is calculated on the floor, while the Scene Understanding is loading and cells are generated. We calculate the distance to the nearest blocked cell, creating a distance field. The center location is the floor cell that is furthest from any blocked cell.
A challenge throughout the placement system was how to use the space most effectively, specifically making it work well in small spaces. We expected the experience to mostly be played in residential settings, where large open spaces are not usually present.
To help pack the objects more effectively, the largest compromise made was to rotate floor-only objects to make them align to the cells on the floor. In this way, they block the minimal number of floor cells and would most likely pack together closely in smaller spaces. Although aligned with the floor cells, the object is still rotated to the closest rotation that faces the calculated room center.
Since we do not have control over the size and shape of the space that the game is played in, the cell-based placement system can potentially fail to place all objects safely, especially in smaller spaces.
So, after all objects have been automatically placed, we apply a few seconds of “easing”, where any objects that are overlapping are gently repelled away from each other.
The easing is done using the Unity physics engine function ComputePenetration, which gives both a direction and distance to move objects so they no longer overlap. Rather than immediately placing the objects at these new locations, the system smoothly moves towards the location. Easing is applied gradually so if the movement causes new overlaps to occur all objects have the opportunity to move away from each other and prevent penetration through walls.
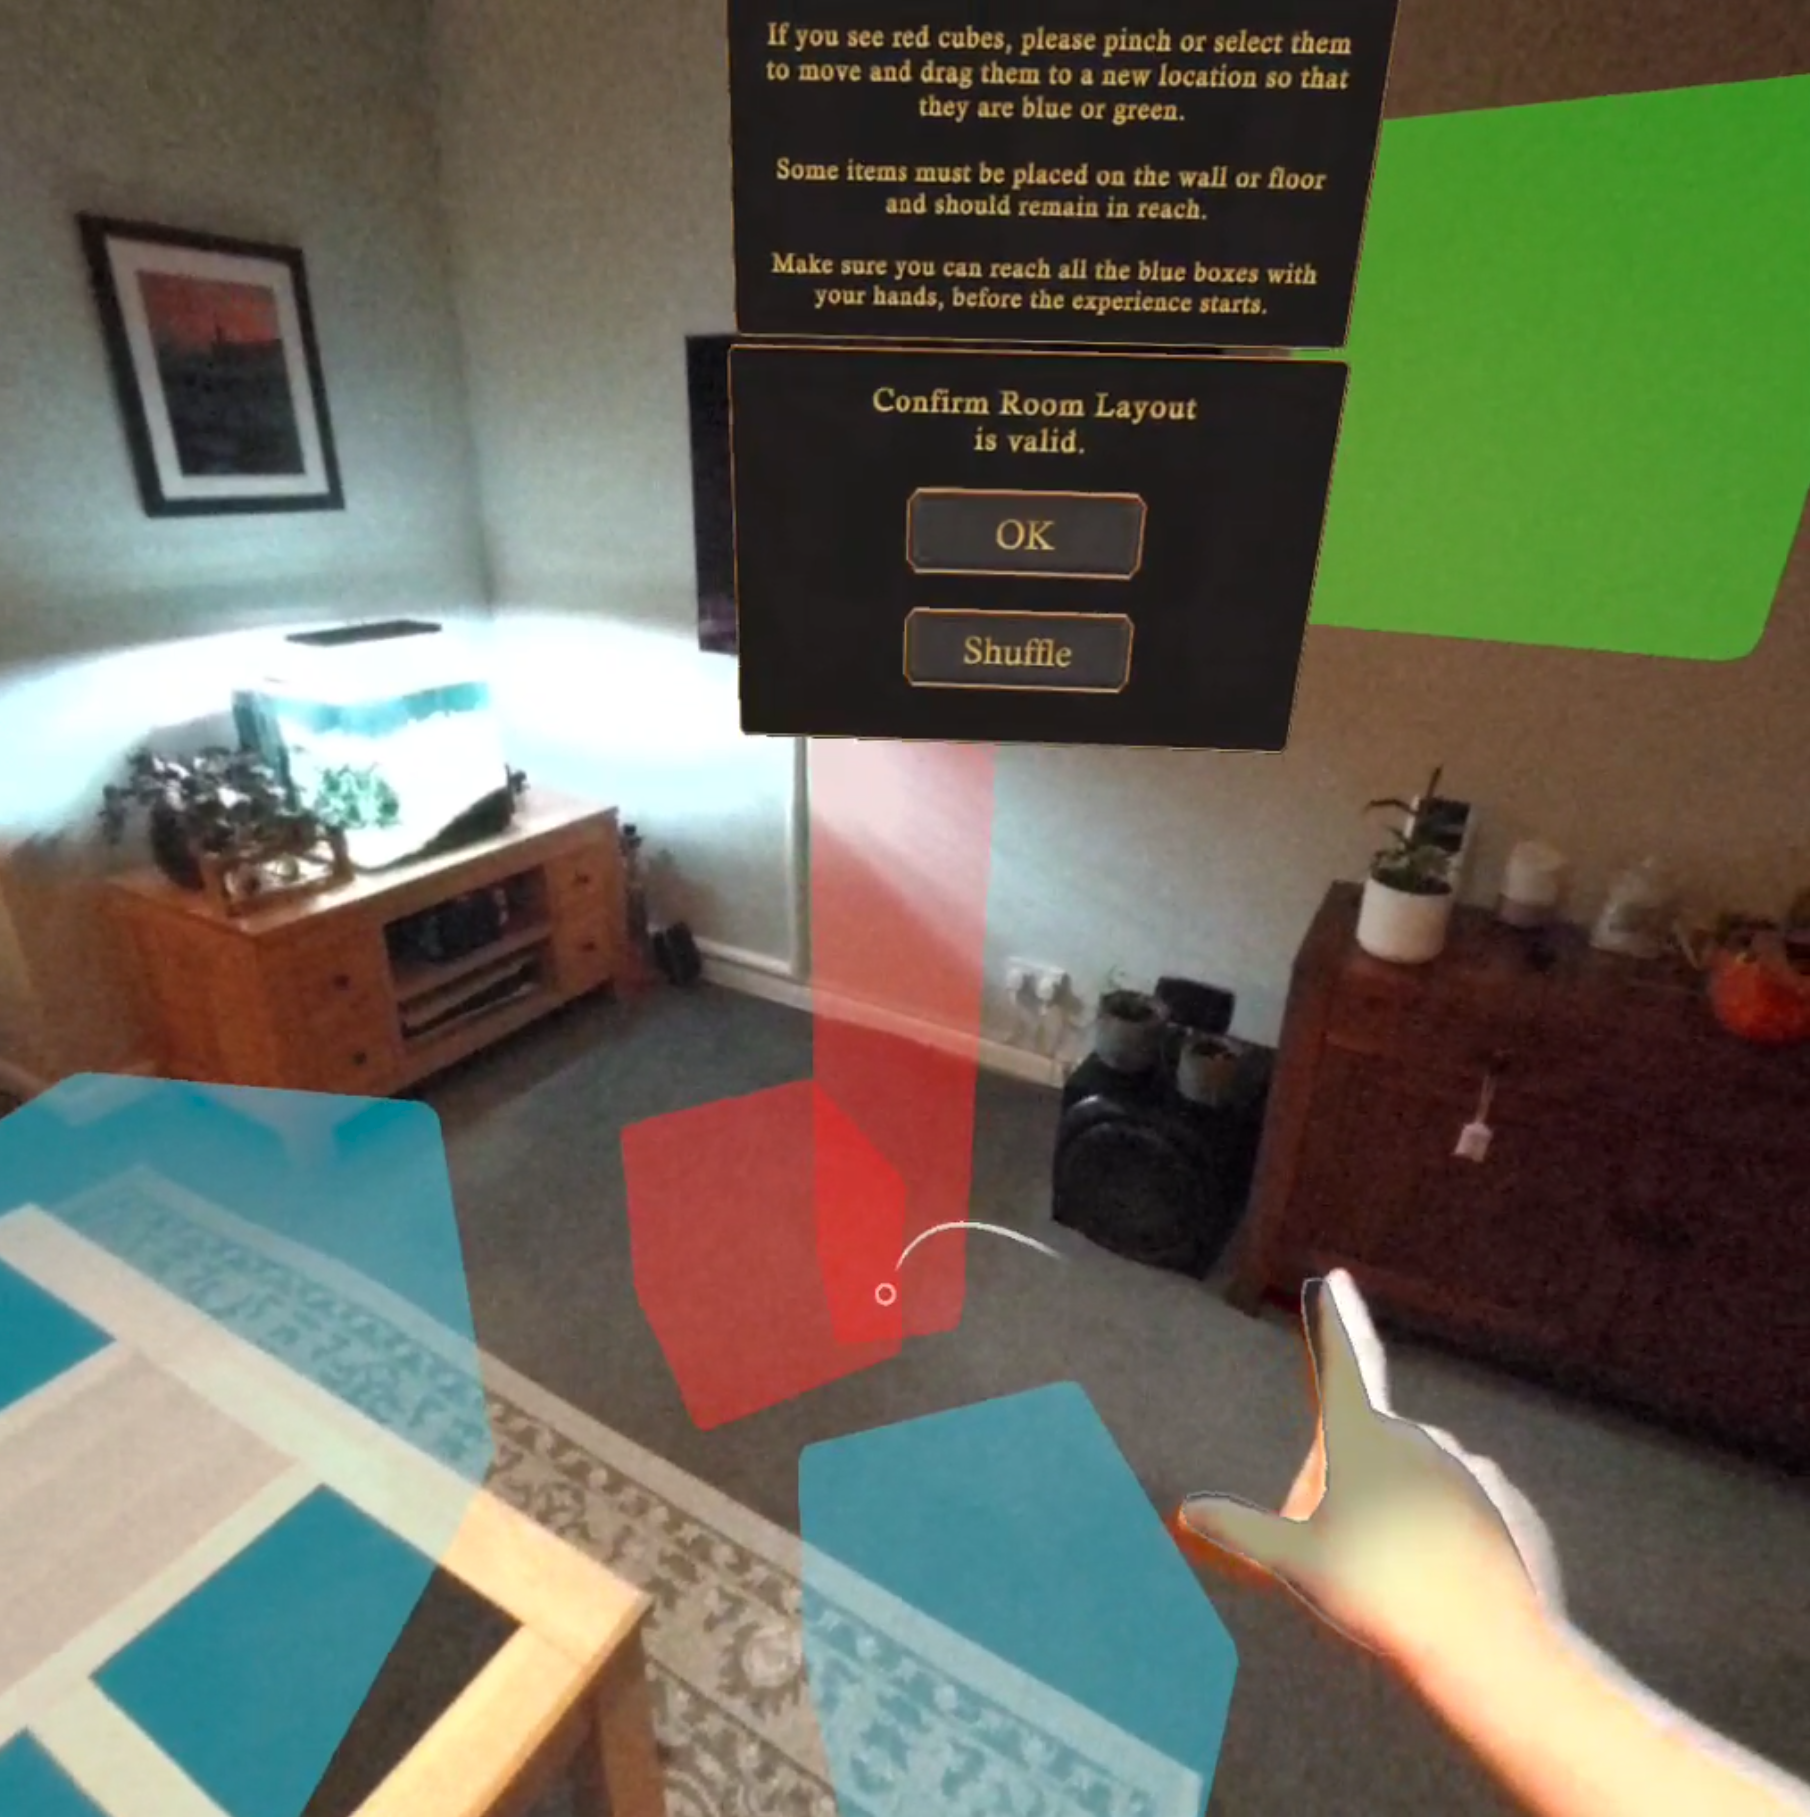
Once the placement is complete, the user then previews the generated layout. In this phase, the game objects are visualized as colored boxes that represent the volume occupied by the digital game objects:
Blue boxes: items that need to be physically reached during the experience because the user will interact with them using hands/controllers.
Green boxes: items that need to be visible, but don’t need to be reached.
Red boxes: items that are in a non-valid location, are overlapping with each other, or are overlapping with scene objects. In this phase, the user has an opportunity to manually move these boxes around, if necessary, to make sure there are no red boxes and that all blue boxes can be physically reached.
After this, the user can confirm the layout and start the experience. Object positions are then stored and used during gameplay to avoid re-doing these heavy calculations.
This system means that every time the experience is played the objects get a new arrangement which adds variety and fun.
Where Next?
This is an exciting area of XR development that’s constantly evolving, some small ideas for how this system could be expanded on to improve user experience or reliability could include:
A soft prompt to the user if objects continue to overlap after easing has completed, directing their attention to the issue.
Add functionality to allow developers to provide a map of where the digital content should be relative to each other, that is adapted to the available space.
For applications that have a large number of objects, it may make sense to group smaller objects with larger ones. For example, placing objects under digital tables.
Head here on GitHub for the documentation and links to the open source code.